
You’ve got your niche, domain name and hosting and now it’s time to actually build your website.
I use WordPress for every site I build. It’s free, widely popular, flexible, and easy to use.
There are other platforms and software for bloggers but this post isn’t about those.
This post will walk you through installing WordPress step-by-step the way I set up my own websites using one of 3 different options.
Are You Sure it isn’t Already Installed?
Your hosting company may have done this for you
Your hosting company may have already installed WordPress for you which will save you some time.
To check if your host has installed WordPress for you bring up your domain in your browser. Do you see a photo and some words like “New WordPress site coming soon”? That’s a clue that WordPress is already installed.
If you can’t tell based on what your site looks like live then do the following:
- Bring up your domain in your browser to look at your site
- Right click on a blank part of the screen (not on a link or clickable item)
- Choose to view the page source (this shows you the source code of any webpage)
- Use your browser’s Find tool and do a search in the source code for wp-content – if you find that phrase in the page’s source code then WordPress is installed

If WordPress is already installed then you’re ready to move to the steps on configuring your WordPress site settings.
3 Installation Options
Pick the one you’re most comfortable with
METHOD #1: ONE-CLICK INSTALL
Option #1 is the fastest way to get core WordPress files on your domain. It’s extremely simple. Click a button, enter some fields, and your host does the rest.
HOWEVER, using a one-click install can introduce security risks to your website:
- Your host may be automatically installing an outdated version of WordPress
- Your host may automatically include plugins that you don’t need and those can introduce security risks to your website
- Your host may not be choosing the most secure username and password options
- Your host may not configure the most secure settings in the wp-config file of your site
I would suggest you NOT use this method UNLESS you are very uncomfortable with either of the other two options.
If you go with this method, jump to the WordPress One-Click Install Instructions section.
Those instructions DO include the steps you’ll need to take to fix many of the security risks of a one-click install so you’re okay to use this method it’s just not the absolute safest way to go.
METHOD #2: AZON BREEZE
I created AZON Breeze specifically for affiliate marketers. It’s designed to save you time in both setting up the site and in publishing all of your posts.
Affiliate marketing is a way that bloggers and website owners use to make money with their website.
The posts (articles) on the site include affiliate links in the written content. An affiliate link is a special link given to you by a retailer. If a site visitor clicks on that link and buys something from the retailer you may earn a commission from the retailer.
AZON Breeze is a copy of a WordPress website installation exactly the way I set up my own sites with a custom WordPress theme and custom post types that handle all the HTML (formatting code) needed to embed product images and affiliate links. All of the plugins I recommend using are already installed which is another time-saving feature.
The custom post types include writing templates INSIDE the WordPress post editor so you only have to fill in the blanks following those instructions to create affiliate marketing posts.
With AZON Breeze you just upload the included files to your hosting account, follow the steps to configure the pre-installed theme and plugins and you’re ready to create content.
There’s also a thorough PDF that shows you how to conduct keyword research for each of the post types and how to create the posts.
If you go with AZON Breeze you can skip everything else in the rest of this post AND the remaining WordPress site set up series because all the hard work is done for you.
You can see a demo video and get your copy here: AZON Breeze
METHOD #3: MANUAL INSTALL
When you manually install WordPress, you must download the latest copy of WordPress, upload it to your hosting account, manually create a database for your site, and run the WordPress installer.
This method gives you more control over the username and password for your database and is more secure than using a one-click install.
If you choose to use this method, jump to the Manual Installation Instructions section.
WordPress One-Click Install Instructions
Use your host
Find the one-click install option for WordPress in your hosting account. It may look like this:
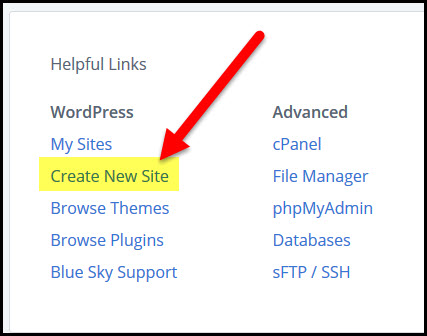
If you can’t find it you may need to search your hosting account’s help section for “one click WordPress install” and follow their provided instructions.
Once you click that option you need to choose the domain (make sure you choose the right one!) on which you want to install WordPress.
Your host should show TWO versions of your domain in the drop down box (one version without www and one with www).
I always choose the version WITHOUT www. First, it makes the default URL for my site shorter. Second, the www is no longer necessary for accessing a website. Whether or not a person enters the www in the address bar of their browser, they will still land on the site.
My host also asks for the name of a directory. I would ONLY use this IF I wanted to put WordPress on a SUBDOMAIN.
A subdomain is like putting a second site on the same domain.
For example, if I wanted to have both mydomain.com AND a store that people could find at store.mydomain.com and use a separate website set up for the store version of my site, I would create a subdomain directory called “store”.
Most of the time you don’t want that – you want to install WordPress on your main domain so leave the directory section blank and click the Next button.
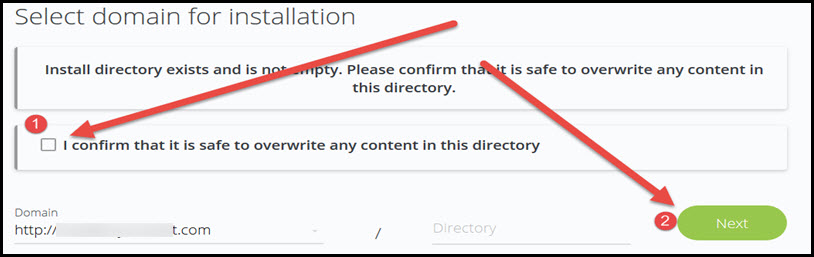
It takes a few minutes for the installation to run and then you may see a screen asking for confirmation. READ THAT SCREEN CAREFULLY!
This screen tells you that the directory exists but that other files are in place and are going to be rewritten. These are probably files that your host added when you assigned the domain to your hosting account and they are safe to overwrite BUT if you have used this domain before or if you are not sure, you want to check File Manager and make sure you’re not going to overwrite anything you would hate to lose.
The next screen presents some basic site information that the install has created for you. You want to change three things on this screen:
- Change ss_site_title to the name of your site
- Change the admin username
- Change the password to something longer for security purposes
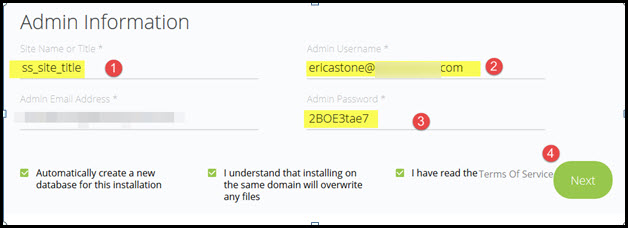
Once you click the Next button, it will take another couple of minutes to complete the installation.
When done, you should see a completion screen with your login details. Save those login details someplace!
You’re done! Next, you need to configure your WordPress settings.
WordPress Manual Install Instructions
Safer than One-Click but more technical
The overall steps for manually installing WordPress are:
- Create a SQL Database in your hosting account
- Create a Username and password for your database
- Upload a clean copy of the latest version of WordPress to File Manager in your hosting account
- Change the wp-config file so that it contains the name of your SQL database and the username/password combination for your SQL database
- Run the WordPress install script
It’s pretty easy once you get the hang of it but it can seem intimidating the first time. Just take it slow – the steps are outlined below.
Keep in mind that if you are not using Bluehost (my affiliate link) then your hosting dashboard may not look like the screen shots below. If that’s the case and you can’t follow along do a search in the Help resources on your hosting account for instructions on manually installing WordPress.
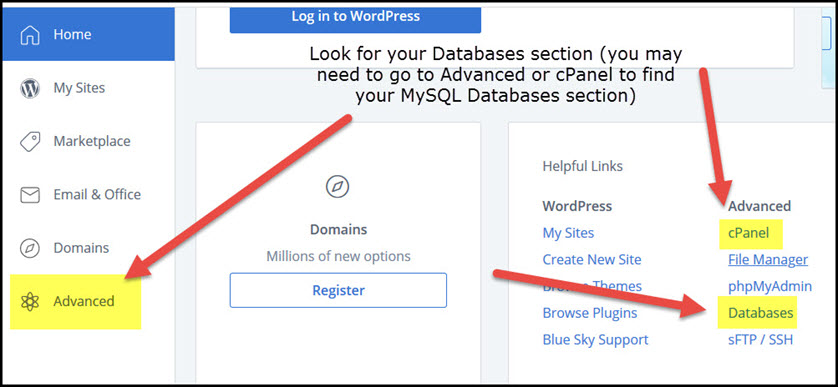
To manually install WordPress:
Log into your hosting account.
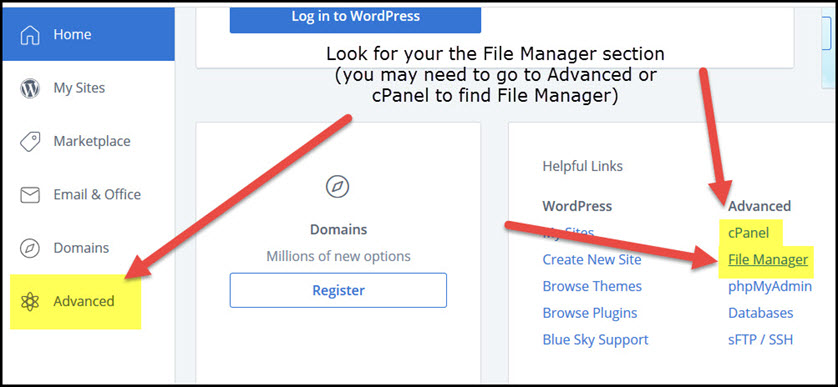
Find the Databases section or MySQL Databases icon (if you don’t see it on your hosting dashboard you may need to find a tab called Advanced or cPanel):
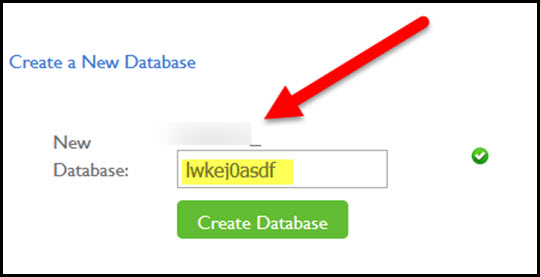
Enter a name for your database in the New Database field.
NOTE: The name of your database is really whatever shows in the blurred out section in the image below where the arrow is pointing. For example, you might see something like diffsitenm_ above that name field. That would mean that the true name of your database is the part above the name field PLUS what you enter in the name field such as diffsitenm_lwkej0asdf – make a note of the FULL database name:
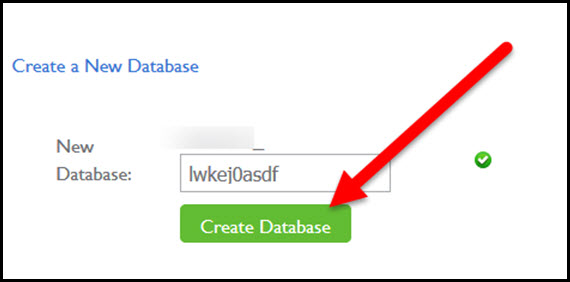
Click the Create Database button:
Click the Go Back button:

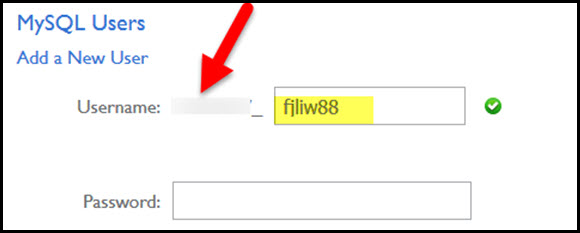
Scroll down to the Add a New User section and enter a name in the Username field.
NOTE: Just as with the database name, your username is not just what you enter in the field but is whatever you see in that blurred out section where the arrow is pointing PLUS what you’ve entered in the username field – make a note of the FULL username:
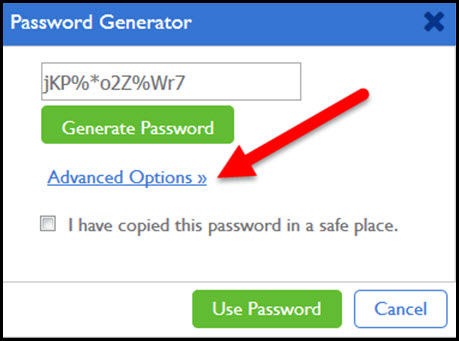
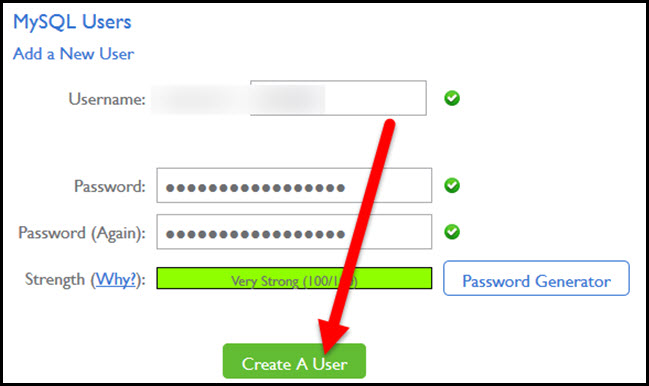
Click the Password Generator button:
Click the Advanced Options link:
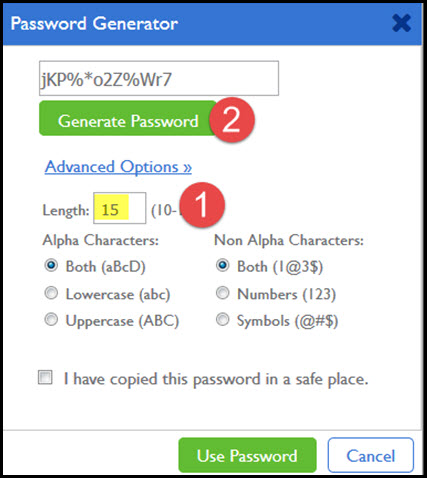
Change the password length to at least 15 characters and click the Generate Password button:
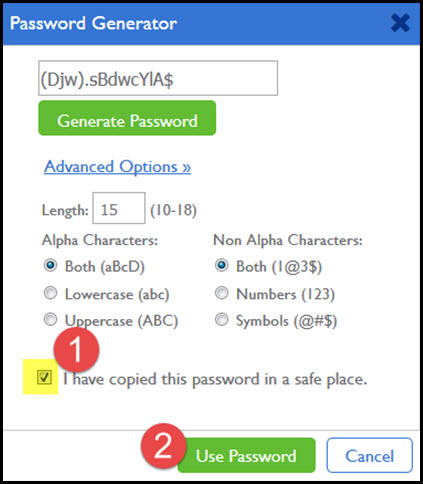
Copy the password, click the box saying you’ve copied the password and then click the Use Password button:
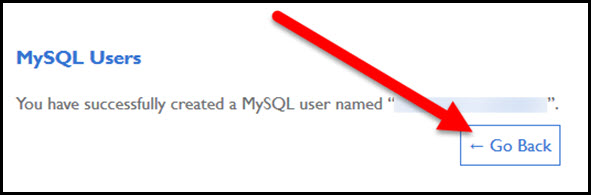
Click the Create A User button:
Click the Go Back button:
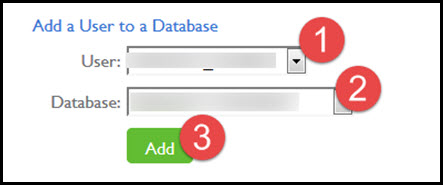
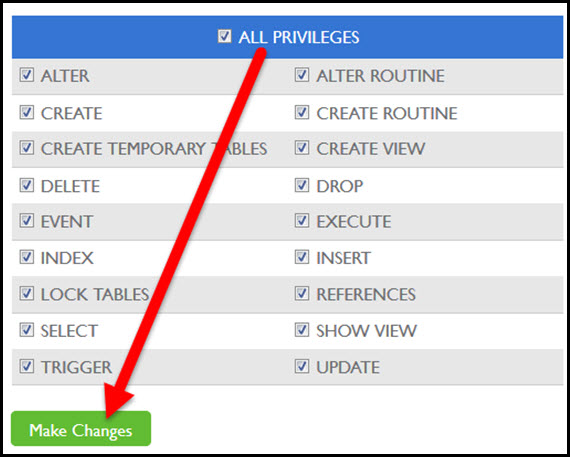
Scroll down to the Add a User to a Database section, use the drop down box to select the name of the new user you created, use the second drop down box to select the name of the new database you created, and click the Add button:
Check the All Privileges box:
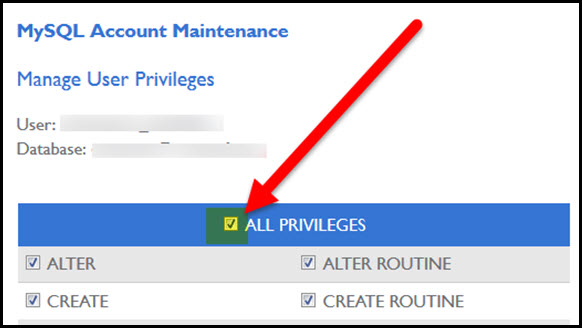
Scroll down and click the Make Changes button:
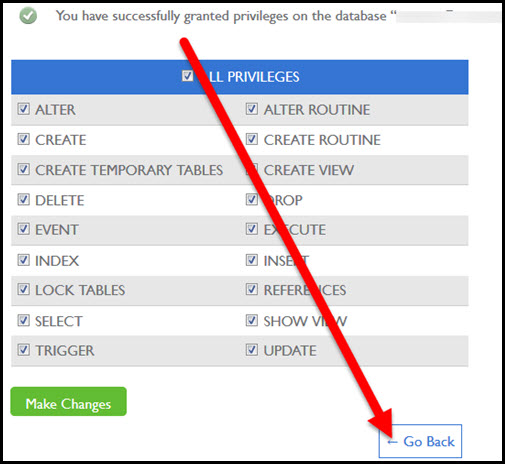
Click the Go Back button:
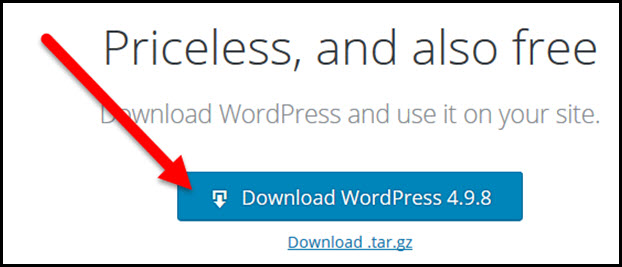
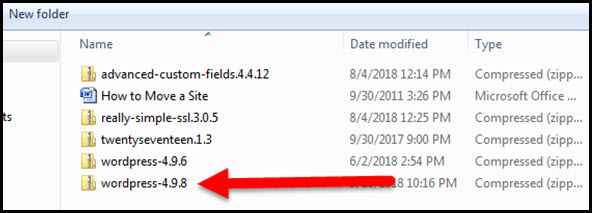
In another tab of your browser, go to this URL and download a new copy of WordPress to your computer (the version will have changed from the one shown in the image below): https://wordpress.org/download/
Go back to your hosting account tab in your browser and find File Manager (it may be in a tab called Advanced, or an icon in your cPanel dashboard, or in a tab in your dashboard called Hosting):
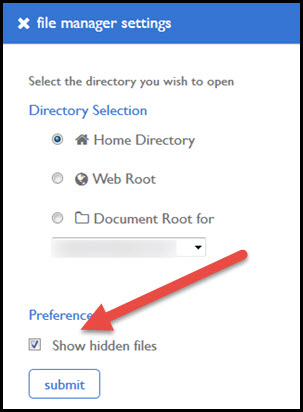
If you see an option to show hidden files, check that option and click the Submit (or other) button to go to File Manager:
File Manager is just like looking at a list of folders and files on your own computer but is, instead, a list of folders and files on your hosting account server space:
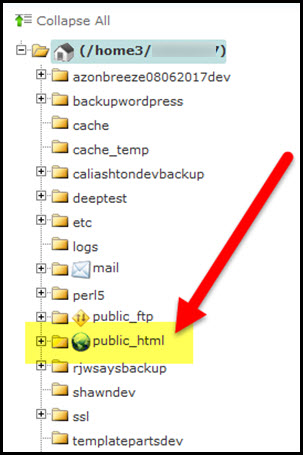
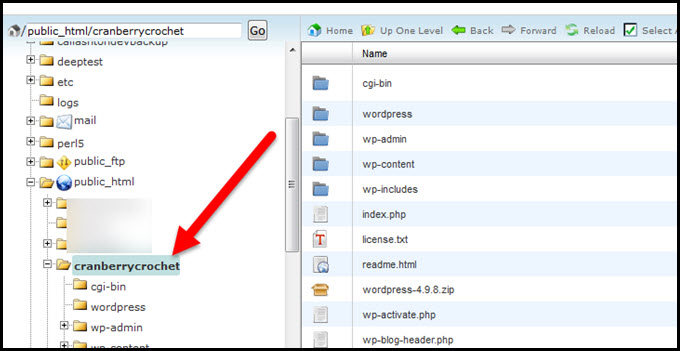
You need to find the ROOT directory for your domain. The root directory is the single folder that holds all the folders and files that belong to your domain.
Many hosting companies store all site folders in the public_html folder but others put your root directory outside of the public_html folder.
The root directory for your domain is one of the following:
- If the domain on which you want to install WordPress is the main domain assigned to your hosting account (the first or primary domain you bought when you opened your hosting account) then the root directory is the public_html folder
- If you see a folder INSIDE the public_html folder that matches your domain name then that folder with the name matching your domain is your site’s root directory folder
- If you do not see a folder inside the public_html folder but, instead, see a folder outside of the public_html folder with a name matching your domain name then that folder with the name matching your domain is your site’s root directory folder
Click on the appropriate root directory for your site so that you see the list of contents for that directory in the middle pane of the screen:
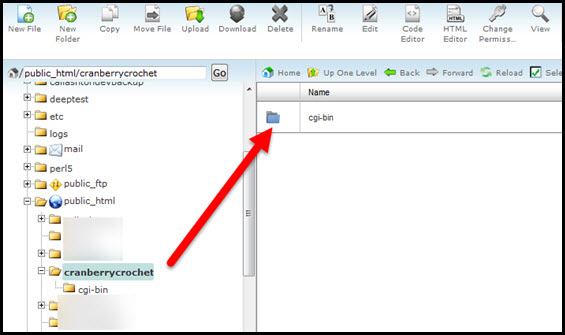
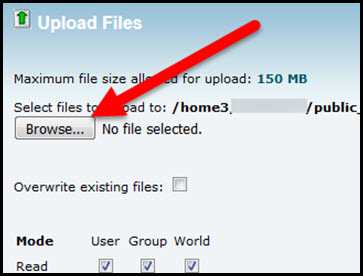
When you’re sure you’re operating in the right root directory, click the Upload button in the navigation menu. (I choose to upload WordPress files right in File Manager but your host may require that you use FTP to upload files. If so, search your host’s Help resources to find instructions for uploading files to your root directory with FTP. Once you’ve uploaded WordPress with FTP return to File Manager in your hosting account and jump ahead to the step of extracting the files.)
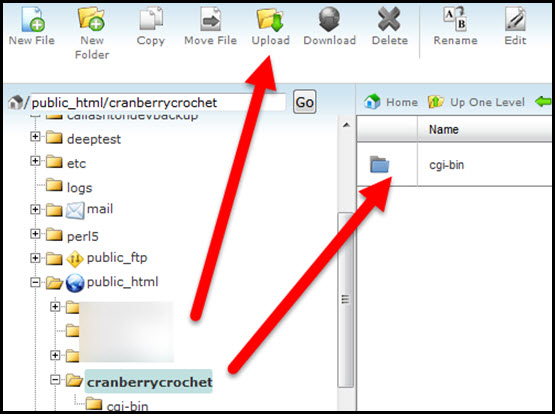
Click the Browse button:
Navigate your computer files to find the new copy of WordPress you downloaded earlier and click on it:
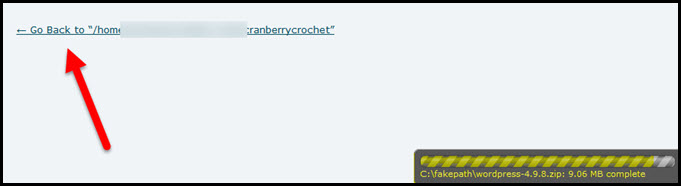
When you see the installation is complete, click the Go Back link:
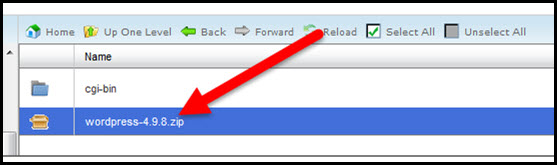
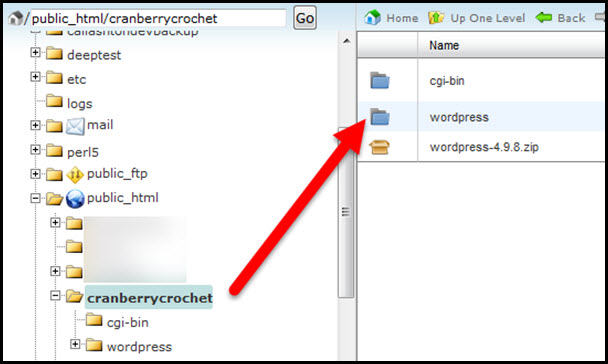
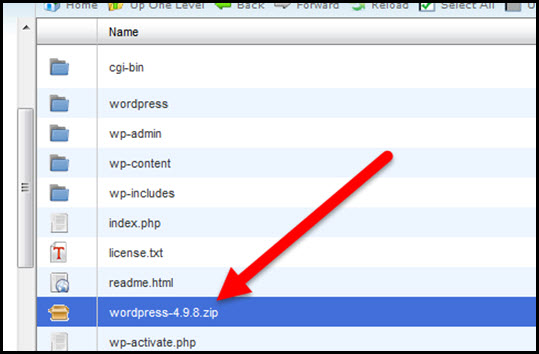
You should now see that WordPress is sitting in your site’s root directory in File Manager as a zip folder:
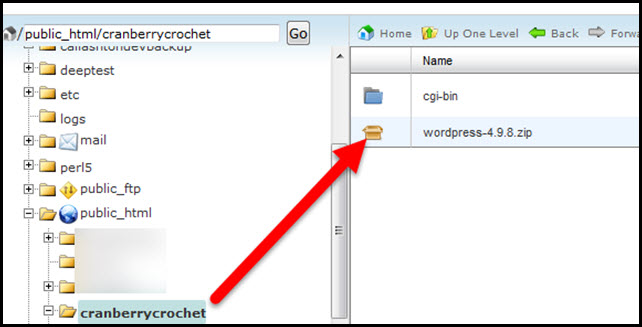
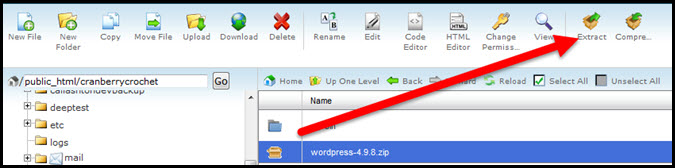
Click on the zipped folder of WordPress so it’s highlighted:
Click the Extract option in your navigation menu in order to unzip the WordPress folder:
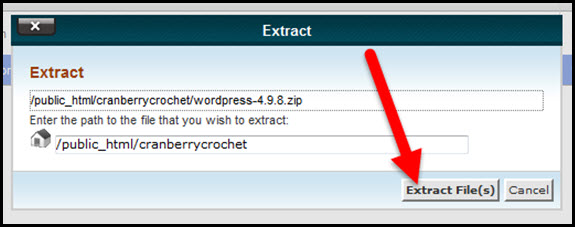
Click the Extract File(s) button to confirm you want to unzip the folder:
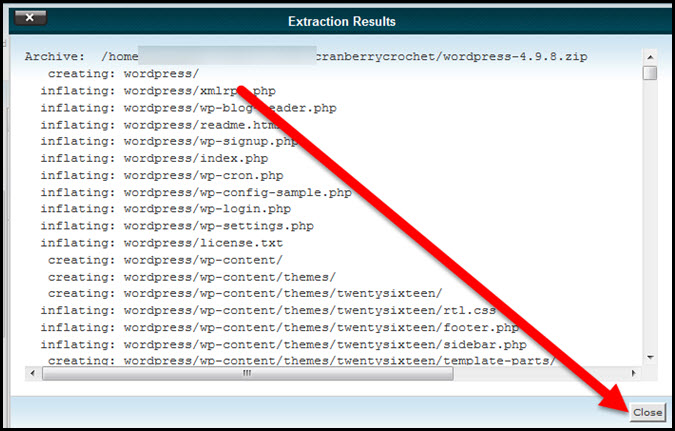
I like to wait about 5 minutes before I take the next step just to make sure all files have been unzipped. When 5 minutes has passed, click the Close button on the pop up screen:
You should now see that WordPress is unzipped and the unzipped WordPress folder is in your root directory:
You now need to move all of the files that are inside the WordPress folder up one level to the root directory. Click the wordpress folder on the left side of the screen in the root directory:
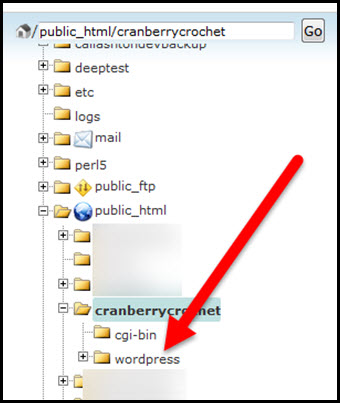
Highlight ALL the files showing in the middle pane of the screen (scroll all the way down to make sure you highlight EVERY file and folder):
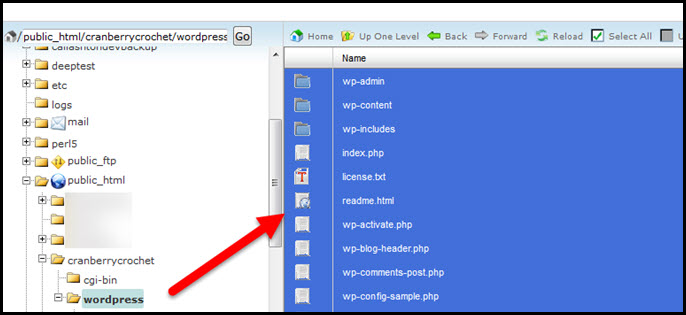
Click anywhere in the highlighted list of files and drag them over to the root directory for your site:
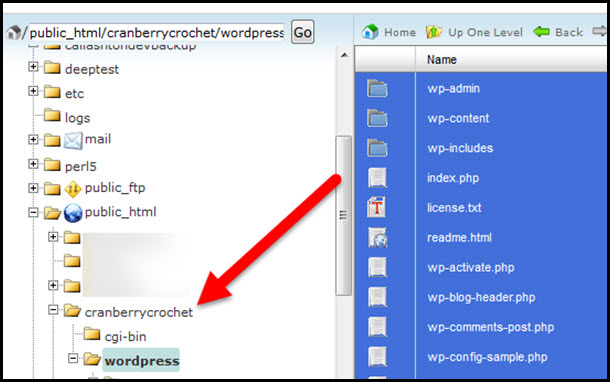
When you click on your root directory on the list on the left, you should now see all of your WordPress files showing in the middle of the screen:
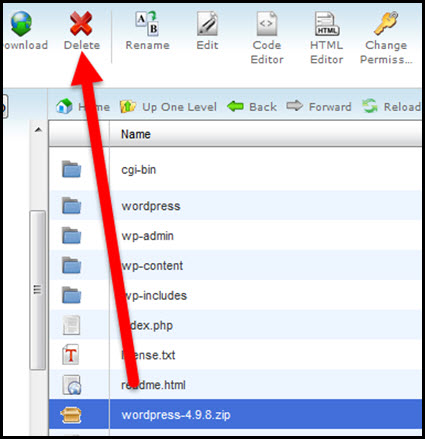
Click on the zipped folder of WordPress in the middle of the screen:
Click the Delete button in the navigation menu (you don’t need the zip folder anymore – it’s just taking up space):
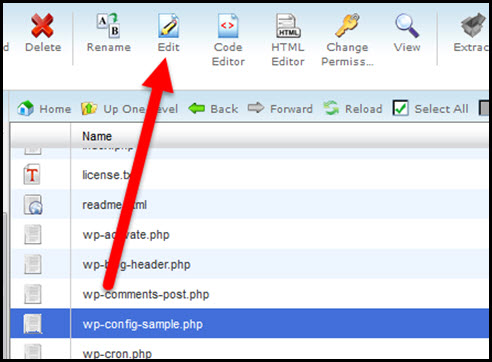
Click the wp-config-sample file in the middle of the screen:
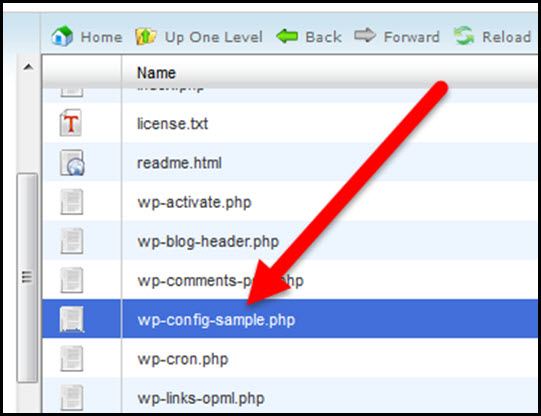
Click the Edit icon in your navigation menu:
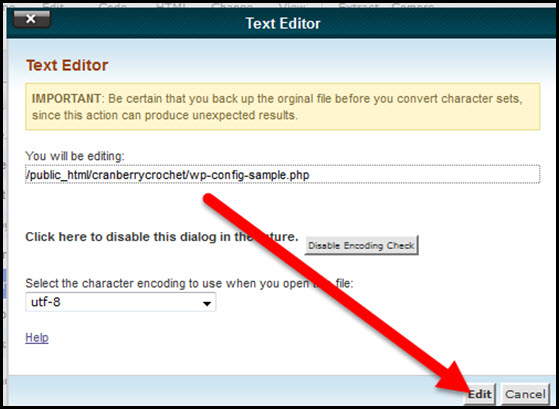
Click the Edit button in the Text Editor pop up box:
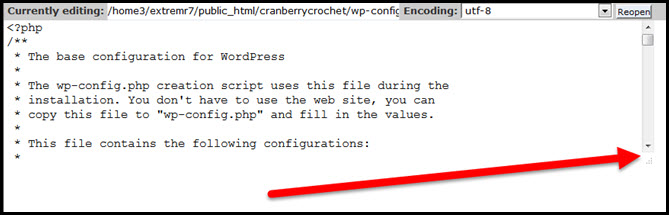
You might need to click and drag this little icon in the side scroll bar in order to see the full contents of the wp-config-sample file:
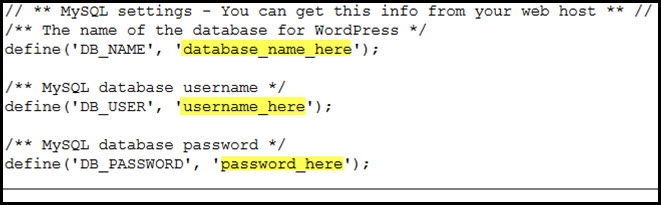
Remember the database, user, and password you created earlier in MySQL Databases? Put your FULL database name between the apostrophes around the database_name_here field, put the database username between the apostrophes around the username_here field, and put the database password between the apostrophes around the password_here field:
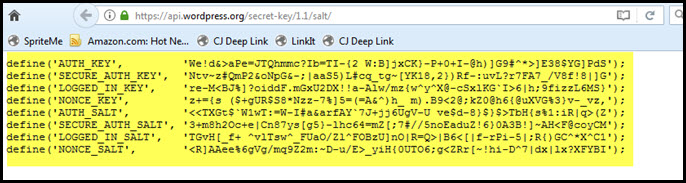
In another tab in your browser, go to this URL: https://api.wordpress.org/secret-key/1.1/salt/
Copy everything you see in the screen:
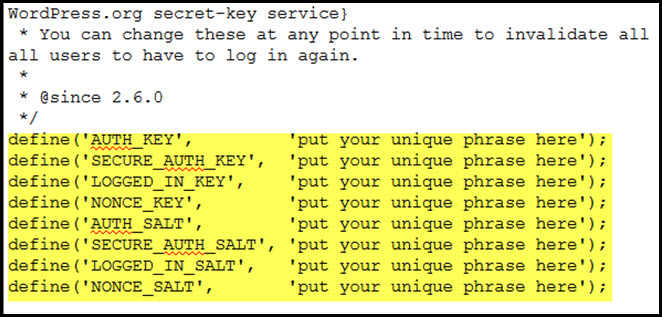
Go back to your wp-config-sample tab in your browser and paste everything you copied OVER the existing default salt keys (you don’t want the default keys to show anymore so you want to replace them with the new ones you copied):
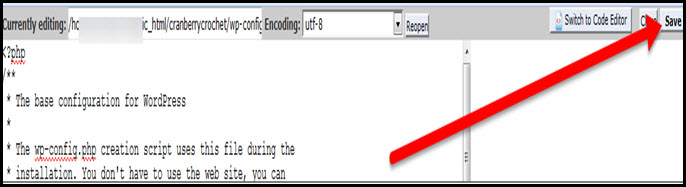
Click the Save button:
Click the Close button:

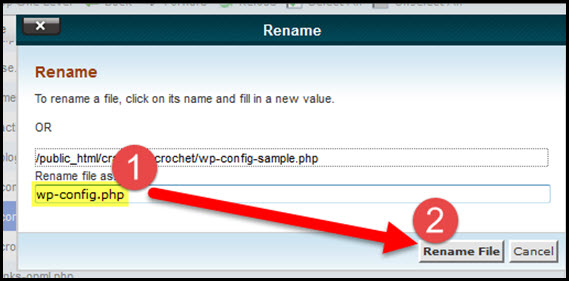
Back in File Manager, right click on the wp-config-sample file and choose the option to Rename the file:
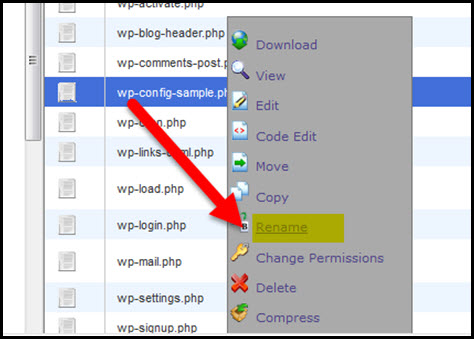
Rename the file to wp-config.php and click the Rename File button:
In another tab of your browser go to yourdomain.com/wp-admin/install.php (remember to change yourdomain.com to match YOUR domain!):
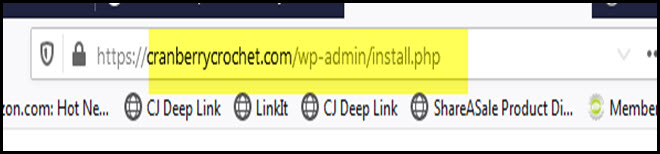
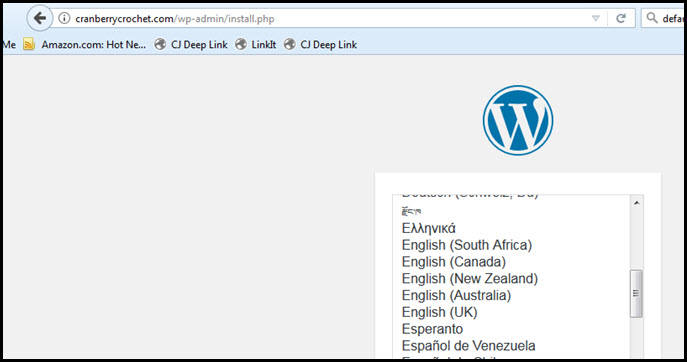
Your site should come up and look something like this:
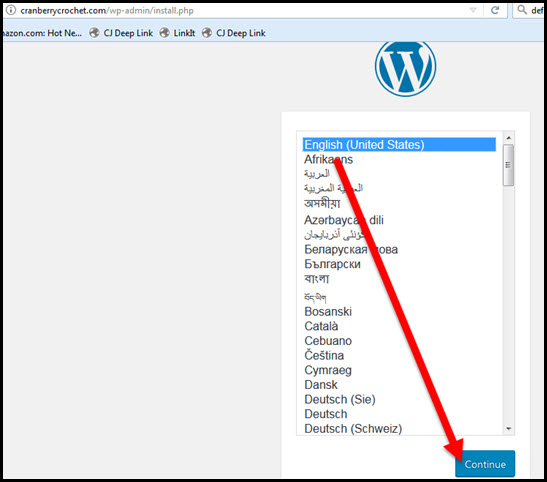
Select the language in which you want the website published and click the Continue button:
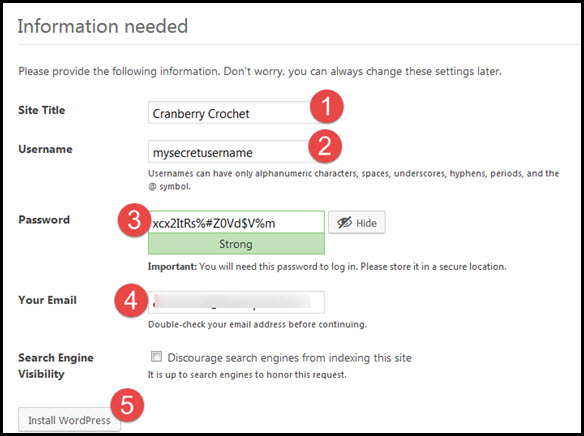
Enter your site name, a username (NOT the word “admin” please!!!), a password, your email address and click the Install WordPress button:
Click the Login button:
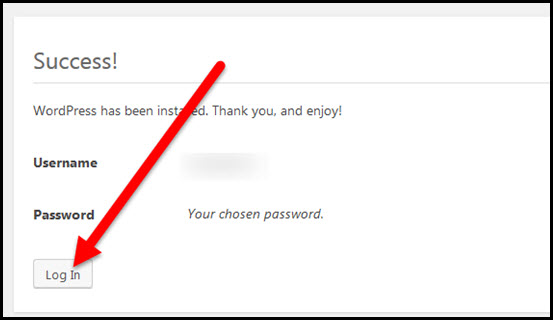
WordPress is now installed and you’re ready to configure your WordPress settings!