
Here’s how to speed up your WordPress website by serving next-gen images for free. You’ll see amazing improvement in site speed without losing image quality!
How quickly your site loads for visitors is a ranking factor in Google’s algorithm so it’s something we should all take seriously. Not only do slow sites not rank as well as they might but browsers may soon warn visitors when they’ve landed on a slow site.
Big companies have lots of resources at their disposal (like whole IT teams!) to take advantage of new tools and software but if you’re a one-person show it’s all up to you.
In a recent check of my site’s rating using Google PageSpeed Insights I saw a suggestion I hadn’t seen before (or hadn’t paid attention to before – I’m not sure). It said “Serve images in next-gen formats”:
What the heck or next-gen images?
Turns out this refers to “next generation” image types – a step above the traditional .jpg and .png formats with which we’re all familiar.
Now there are new types and they really do speed things up!

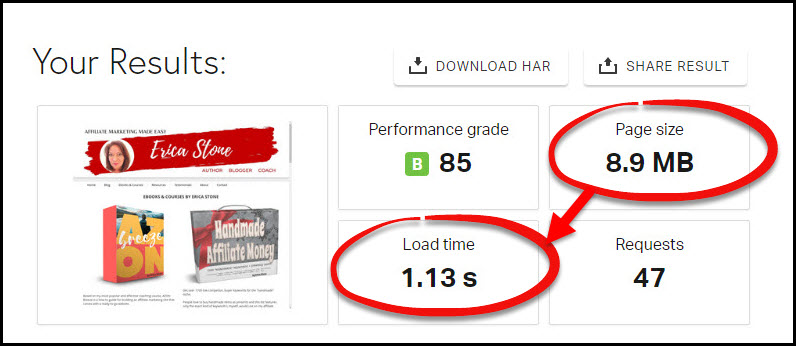
I chose to start with a page on my site that was heavy on .png images – my Ebooks & Courses page.
Pingdom’s Website Speed Test Tool showed the page size was 8.9 MB with a load time of 1.13 seconds before resizing and converting my images to next-gen (which was actually better than I was expecting for that page):
After only resizing images and converting them to next-gen the page size and load time dropped significantly:
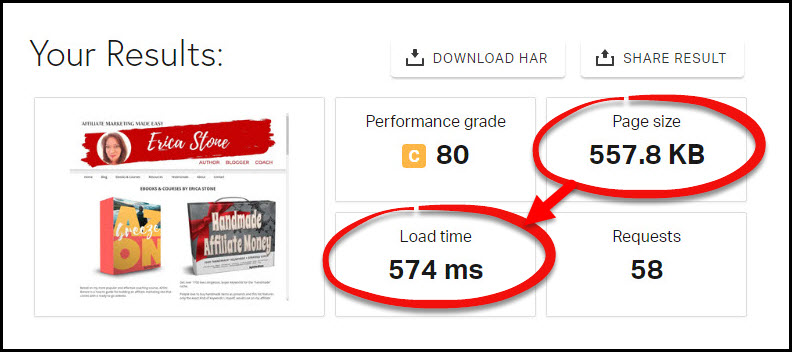
Page size came down to 557.8 KB and the load time dropped to 574 milliseconds. (At the time of this writing this site is running on SHARED hosting with Bluehost *my affiliate link.)
Notice my score dropped, too, though? That’s a direct result of using next-gen images because to present the right image to the right browser requires a redirect and Pingdom counts redirects against your score. Ignore it – fast is fast and that’s what matters – not the score!
Interestingly, Google themselves developed one of those new images types – webp images – back in 2010 (so they’re not really new as much as they are new to us common folk).
Webp images have a file extension of – you guessed it – webp. Instead of thisismyimage.jpg you’ll now see things like thisismyimage.webp.
These next generation image formats are designed to be smaller in file size while maintaining image quality.
I was able to convert a jpg image with a file size of 54.8 KB to a webp image with a file size of 19.6 KB. That’s a 64% reduction in file size.
Since image file sizes are one of the biggest contributors to slow load times making use of these smaller files is a giant step forward in speeding things up and helping small sites keep up with the big guys!
When these image types were first introduced hardly any browsers were equipped to handle them but things have changed.
Many browsers today CAN handle them and for those that can’t we can use some code in our WordPress sites that provides both versions of an image (a traditional version and a next-gen version). That way an image is always served to our site visitors and their browser will default to next-gen if it can handle it and to a traditional format if it can’t.
This does mean you need TWO version of every image you use for your site – a traditional version like .jpg or .png AND a next-gen image like webp.
I was so excited to figure out how to do this and then I ran into brick wall after brick wall because every article I read recommended one of two things.
It either required I know how to do something very technical (like compiling libraries on my server?!) or that I buy a plugin and/or pay for monthly credits to convert images to one of these new formats.
I’m cheap – I don’t like to pay for things I don’t have to pay for and I’d read that Google’s version of next-gen images was open source – meaning free.
Why would I have to pay if the technology was free?
In part, I realized that unless you’re really technical it’s a bit complicated. If you’re the type who loves to run line commands on your computer feel free to download Google’s encoder tool and have yourself a blast.
That’s not for me. I then realized I didn’t just want free I also wanted:
- Something simple
- Batch processing of files
- Ability to preview the image quality before converting
Back on the hunt I went.
Plugin or Manual?
Even “free” plugins aren’t free
There are “free” plugins that will handle this whole process for you. They’ll make changes to your site’s htaccess file so that the proper image type is served to each browser and they’ll convert all of your existing and future images into next-gen formats.
However, there are some drawbacks:
- Some plugins offer a limited number of image conversions per month for free and require credits or a monthly subscription to raise the limit. Since WordPress AND your WordPress theme can, by default, create multiple image sizes for EVERY image you upload you could end up paying to convert a LOT of images that don’t need to be converted.
- Some plugins offer a limited number of monthly visitors to view next-gen images before they start charging you a monthly subscription.
- Some plugins store the converted images on their server and not on your site. If their server goes down or they go out of business you will have to start all over unless you took the time to save copies of any converted images but you’d still have to get them onto your site.
- A plugin may not find and convert images being used inside of your theme files so only images embedded in your posts or pages are converted and you’re not fully leveraging the speed of serving next-gen images.
- A plugin may not identify any ad banner images on your site that could be converted to better improve site speed.
- Image converter plugins may not be compatible with other plugins you’re using.
- Adding yet another plugin to your site could further slow down your site.
NOTE: If you are hotlinking to affiliate product images (like Amazon) neither a plugin nor the manual method is going to convert those images because they’re not stored within your site. You’ll have to wait until the owner of those images (like Amazon) provides a next-gen image format but you can at least convert all other images on your site. If the affiliate program allows you to download the images and upload them to your site then you can convert them but Amazon prefers that you hotlink to the images on their server instead.
If none of those things phase you then check out EWWW Image Optimizer or WebP Express.
After a few days of digging I found a solution and was able to work out the steps I needed to convert the existing images in my WordPress posts and pages to the webp format AND modify my WordPress site so that it would present next-gen images to browsers that would accept them.
This process doesn’t require a plugin or a monthly subscription and I can use it across all of my WordPress sites.
Bear with me as there’s a method to my madness in these steps. It’s a little time consuming (depending on the size of your site) but it helped me achieve two other tasks that I’d been putting off for awhile: resizing images to also help reduce site speed AND cleaning up my Media Library to delete images I wasn’t using.
Be safe! Back up your site before making any changes!
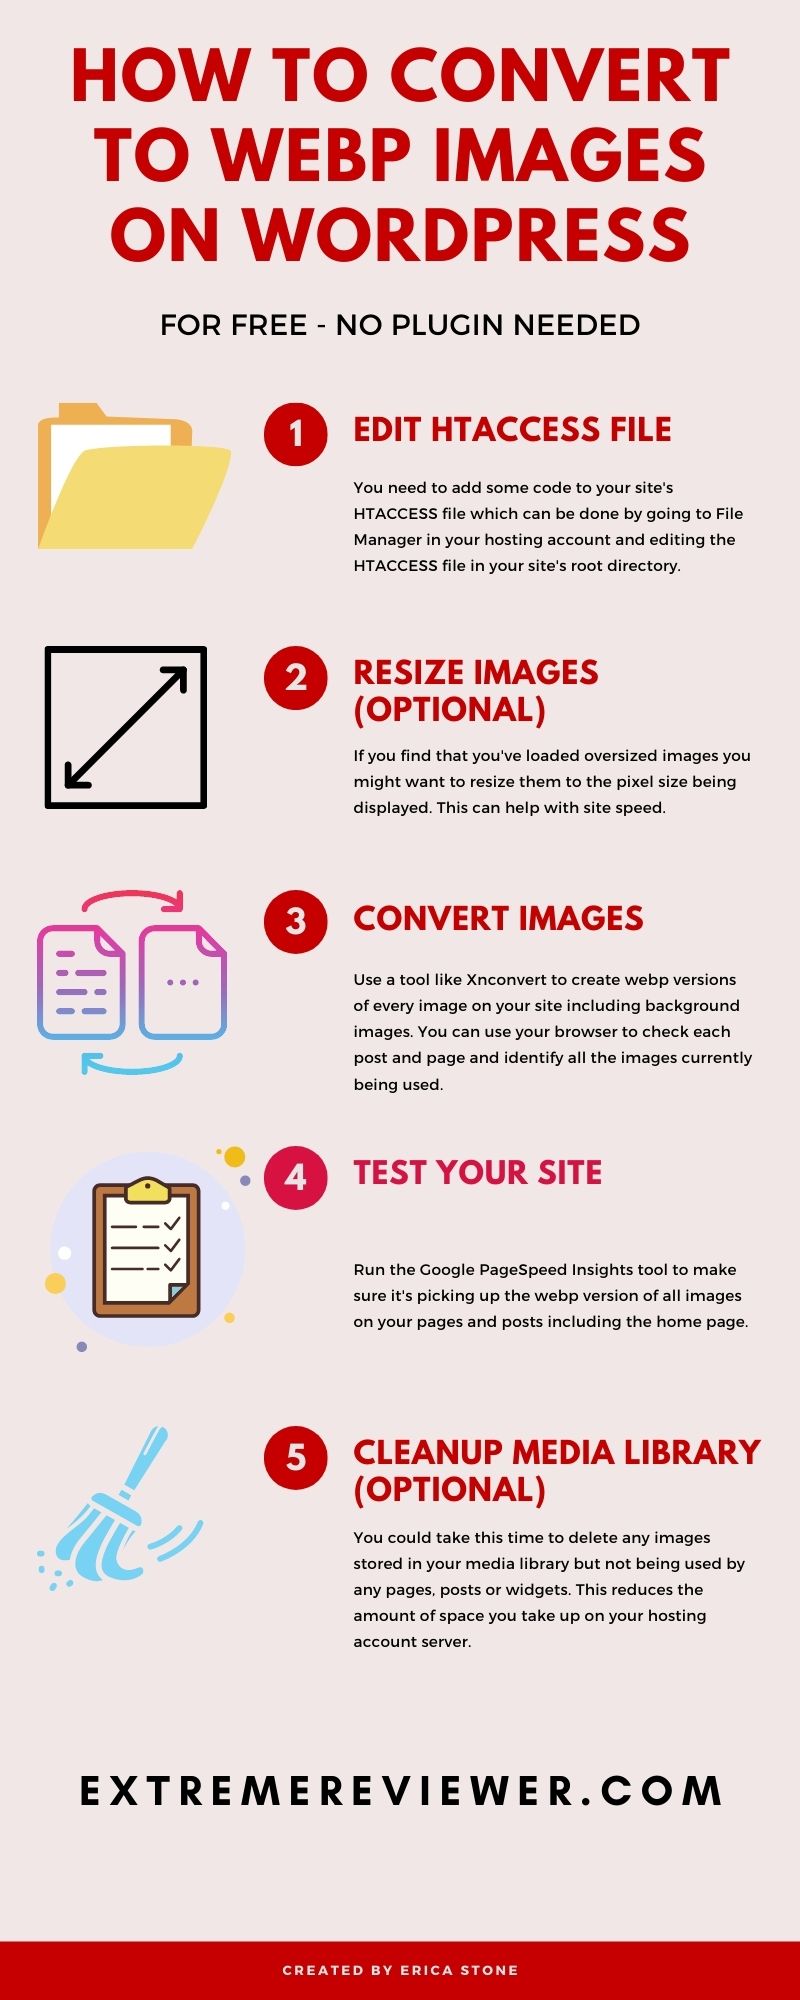
Step #1 – Modify WordPress
Edit HTACCESS file
Remember, not all browsers can display next-gen images so we first have to tell our site to check with the visitor’s browser to see if it will accept those images and then have the browser refer to the correct image URL for the format they’ll accept.
We can add code to the htaccess file of our WordPress sites so that it will handle this task.
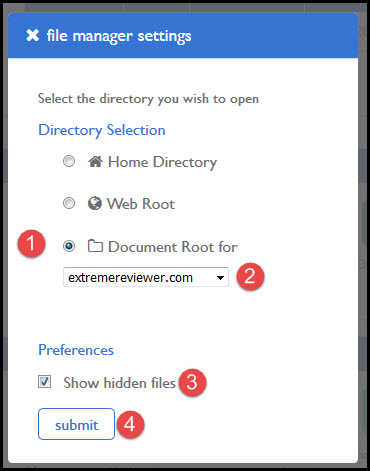
- Log into your hosting account
- Click on the File Manager icon
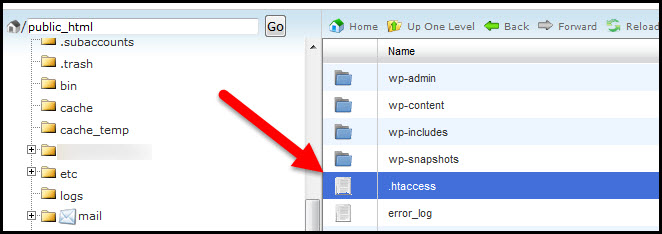
- In the pop-up box choose Document Root, use the drop down box to select your site, check the box to Show Hidden Files and click the Submit button:
- The middle part of the screen that comes up should be all the folders and files in the root directory of your site. Find the .htaccess file and click on it to highlight it:
NOTE: If you do not have an htaccess file make sure you’ve chosen to view hidden files in File Manager. If you’re sure you’ve done so but still don’t see it log into your WordPress dashboard, go to Settings/Permalinks and click the save button (no need to change anything). This should force an htaccess file to be created. Go back to File Manager in your hosting account, refresh your browser, and look for the file.
- Click on the Edit option in the toolbar at the top of the screen while the htaccess file is highlighted:
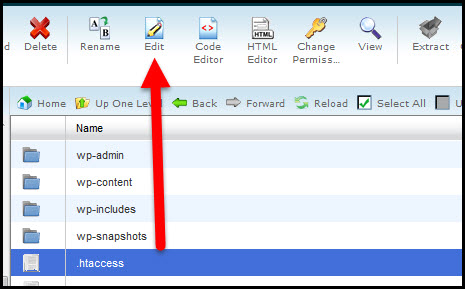
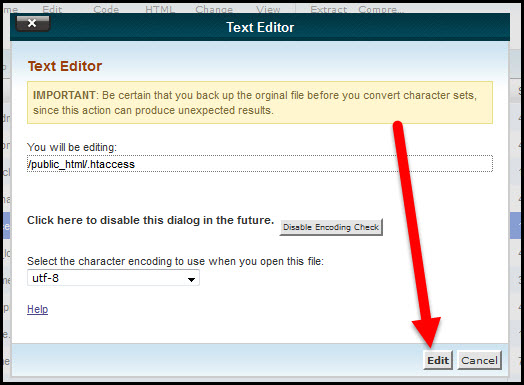
- Click the Edit button again in the pop up box:
- You should now be inside the content of the htaccess file. Put your cursor at the very top of the code already in the file and click the return key on your keyboard twice to create two blank lines:
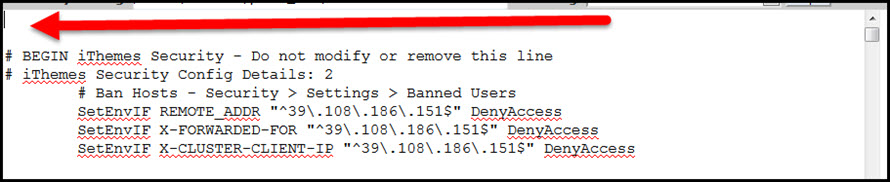
- Paste the following code into the top of that file:
<ifModule mod_rewrite.c>
  RewriteEngine On
  RewriteCond %{HTTP_ACCEPT} image/webp
  RewriteCond %{REQUEST_URI}  (?i)(.*)(\.jpe?g|\.png|\.jpg)$
  RewriteCond %{DOCUMENT_ROOT}%1.webp -f
  RewriteRule (?i)(.*)(\.jpe?g|\.png|\.jpg)$ %1\.webp [L,T=image/webp,R]
</IfModule>

<IfModule mod_headers.c>
  Header append Vary Accept env=REDIRECT_accept
</IfModule>

AddType image/webp .webp- Click the Save button:

NOTE: If you’re using a CDN and/or caching plugin this may cause some issues if your CDN or caching plugin does not support webp images. This won’t break your site but you may find that webp images don’t get cached by your CDN. The image sizes are going to be so much smaller that you may not mind. I am using W3 Total Cache for caching and not using a CDN and have no issues. If you find during the later testing steps that you have a problem remove this code from your htaccess file and contact your CDN for assistance in serving webp images.
That’s it! Your site is ready to work with all browsers to display webp images if the browser accepts them and the traditional image type if not.
Step #2 – Resize Images (Optional)
Skip this if you are sure image sizes are not slowing down your site
Since we’re working with images anyway and another opportunity often listed in Google PageSpeed Insights is to properly size images we might as well take the time to tackle both at once.
If you’re sure your images are all perfectly sized you can skip this step and go on to step #3.
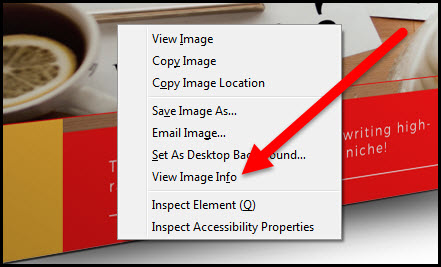
- Open your Firefox browser (Firefox’s View Image info is easier to use for this task)
- Bring up any page or post on your site
- If you’re using a lazy load plugin for images scroll all the way to the bottom of your page or you won’t see all the image info needed in the next step
- Right-click on any image on the page
- Choose the View Image Info button:
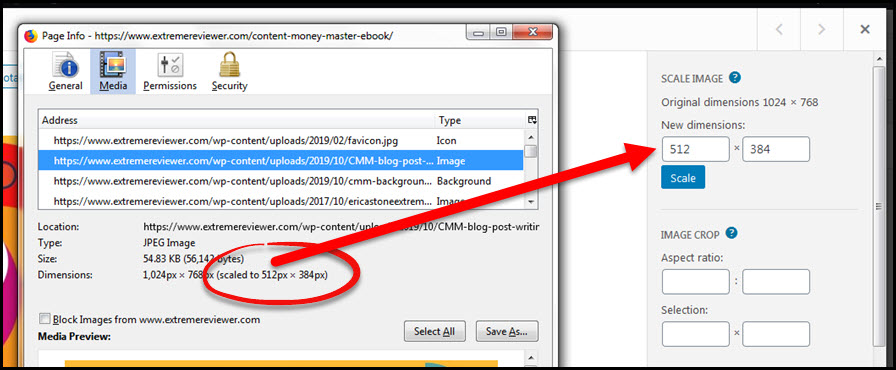
- The pop up box lists ALL images on the page – click on the first image in the list and look at the Dimensions information. An image that is properly sized will provide only the size details.
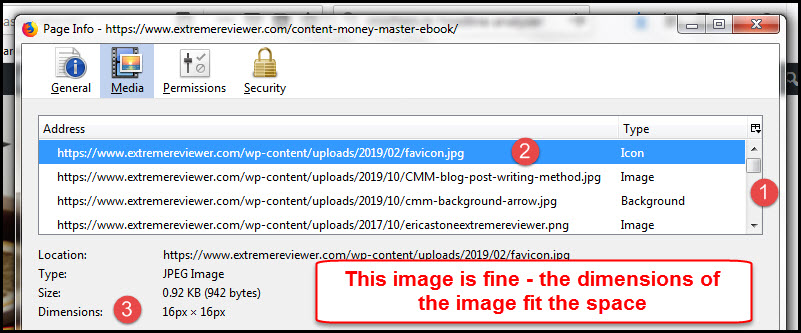
An image that needs to be resized will show “(scaled to…)” in the Dimensions field:
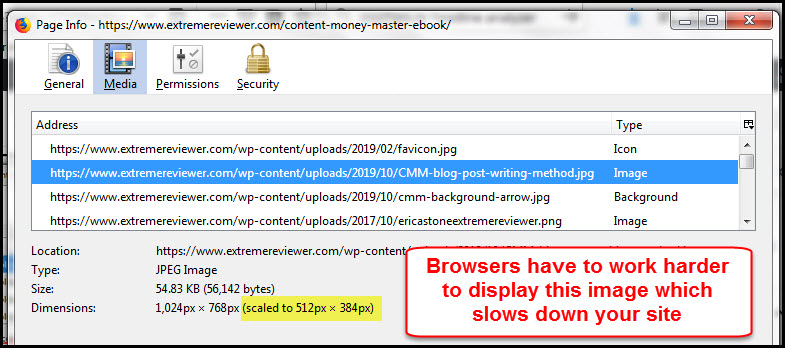
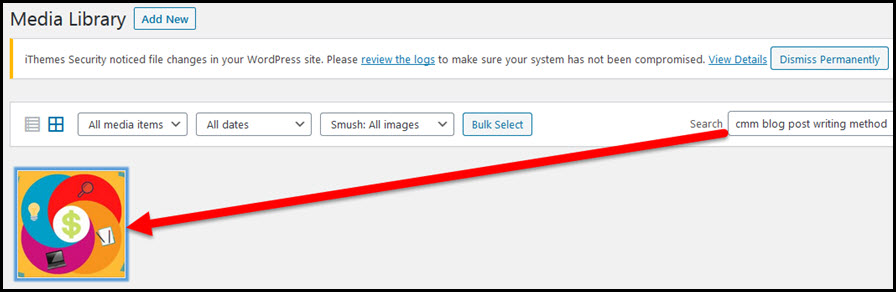
- Search your WordPress Media Library for the image and click on the image in the search results:
NOTE: Some images may not be on your site’s server and may need to be resized manually or left alone. If the domain in the image URL is not yours then the image is coming from some other site (a hotlinked Amazon product image, an image served by a CDN, an ad banner image, etc.). If the owning site allows, you could save the image to your computer, resize it using your own image editing software and upload the correct image size to your post or page. Some images may start with “data:image/svg” and a long string of characters. Those are scalable vector graphics and may be used by a plugin, theme, or your own browser to show images. Ignore those image types for this exercise.
- Click the Edit Image button under the image:
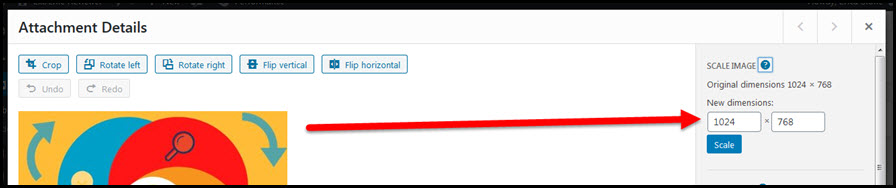
- Find the New Dimensions fields for the image:
- Replace the number in the first New Dimensions box with the first number from the “(scaled to…)” information from the View Image Info pop up box for that image (the second dimension field will automatically change to align with the first number):
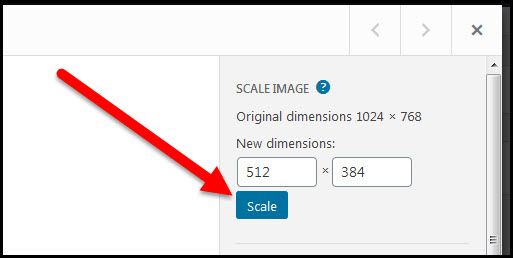
- Click the Scale button:
- This creates a NEW version of the image in your Media Library. You’ll need to edit your post or page to embed the scaled image so the correct size will be used.
- Click on each image in the Firefox View Image Info pop up box one at a time and repeat the steps to resize any that need to be changed (remember to edit any posts or pages so they use the proper image size)
- Repeat all of the above for every other page and post on your site
- If you’re using a caching plugin and/or CDN make sure to purge all caches so the new images are shown to site visitors
That’s it for image resizing! Now, on to converting our images to webp.
Step #3 – Convert WordPress Images
Use a converter tool
The next step is to create webp versions of all images currently being displayed on your site. This will give you TWO copies of every image.
These webp copies also need to have the identical file name (upper/lower case, dashes, etc.) AND location of the original image.
This means if you have an image called Mypost-image.jpg in your wp-content/uploads/2019/11 folder then you also need a Mypost-image.webp image stored in that same folder.
We’re going to use Firefox again (Firefox 65 or newer) and a software program you can download for free called XnConvert.
- Go to XnConvert, scroll towards the bottom of the page and choose one of the download options:
NOTE: While this tool is free for personal use there is a Donate button or the creator asks that you pay for a license based on number of employees if using this for a company which is fair, cheap and a one-time fee.
- Find where you saved the XnConvert software and launch the program
- Use Firefox to bring up a post or page of your site where you want to use webp images
- If you’re using a lazy load plugin for images scroll all the way to the bottom of your page or you won’t see all the image info needed in the next step
- Right-click on any image on the page
- Choose the View Image Info option:

- The pop up box shows a list of ALL images displayed on the page. This will include images in your theme, images that come from other domains, and even the images added by your browser if you have tools like the Pinterest Pin It bookmarklet button added to your browser. Hold the CTRL button down on your keyboard while you click on every image URL where the domain equals YOUR domain.
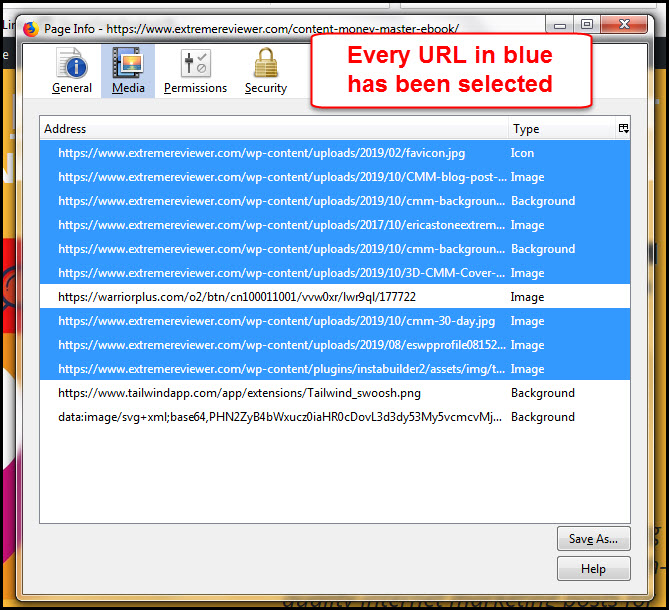
NOTE: If you are using a CDN then the image URLs you see are those from your CDN and not from your site. You may need to open your post or page and manually list the URLs embedded within, find those images in your media library, save them to your computer and move to #9 below.
- Click the Save As button in the pop up box:
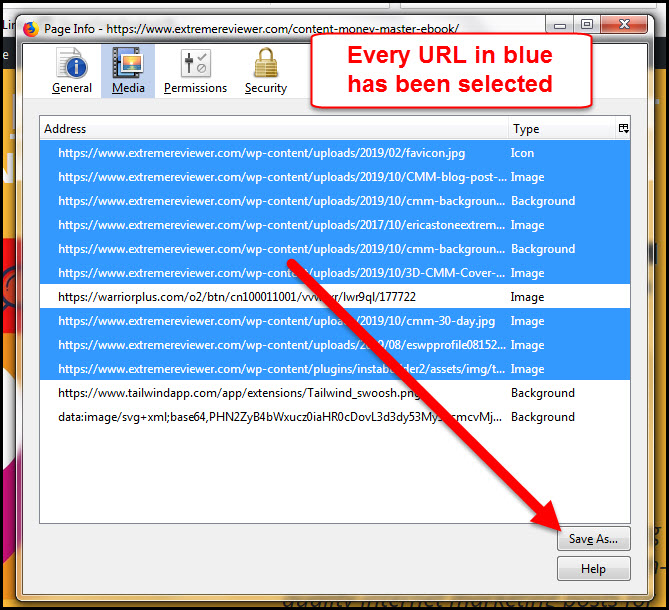
- Save the selected images to a new folder on your computer (I created one called WEbP Images):

- Go to your XnConvert app
- Click the Add Files button on the bottom left:
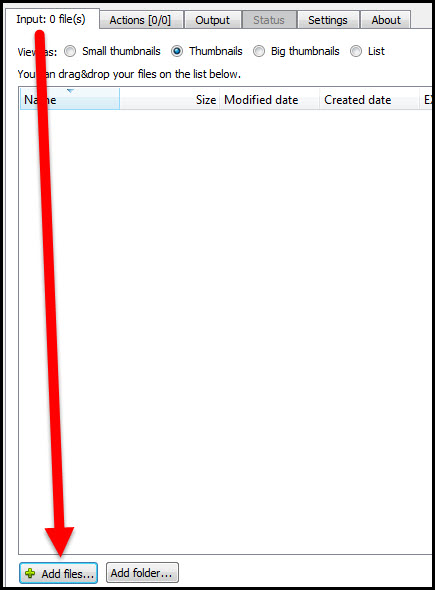
- Browse your computer to find where you saved your images, click on the first image and then hold the Shift key on your keyboard while clicking on the last image to highlight ALL of the images:
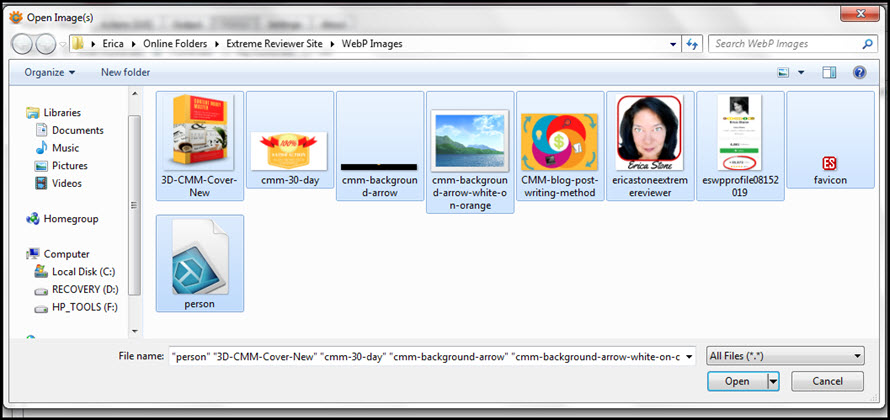
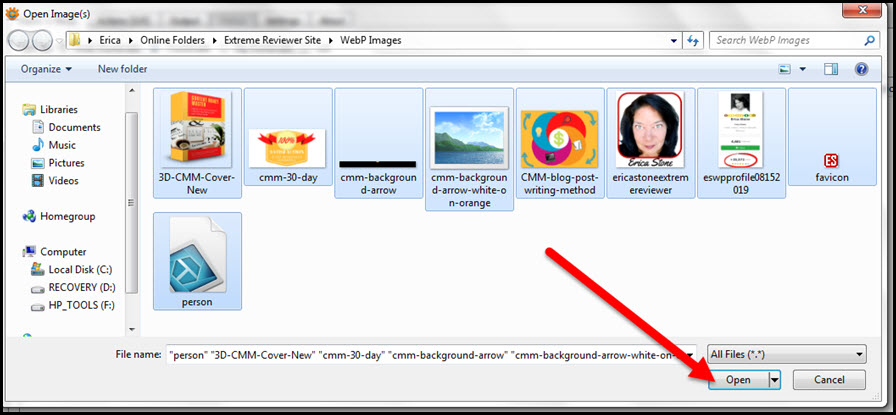
- Click the Open button to load the images:
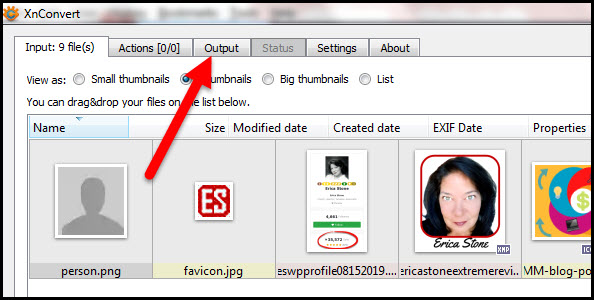
- Click the Output tab in XnConvert:
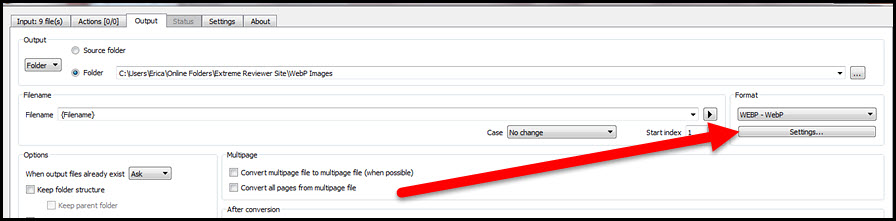
- Select the “Folder” option for output, use the box with the three dots to choose the SAME folder where you saved your images, select the WebP format type, and remove everything from the Filename field except {Filename} (this will keep the images named exactly the same way as they are on your site):

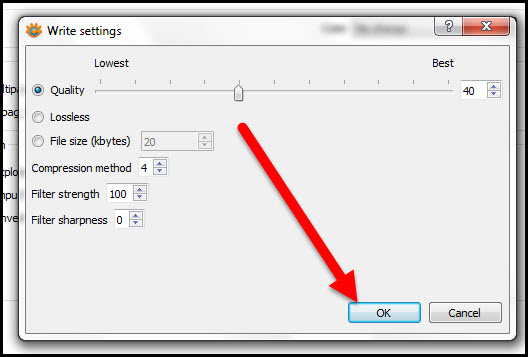
- Click the Settings button:
- This is where you choose the quality settings for your completed images. I am using Quality of 40, Compression method 4, Filter strength of 100 and Filter sharpness of 0:

- Click the OK button:
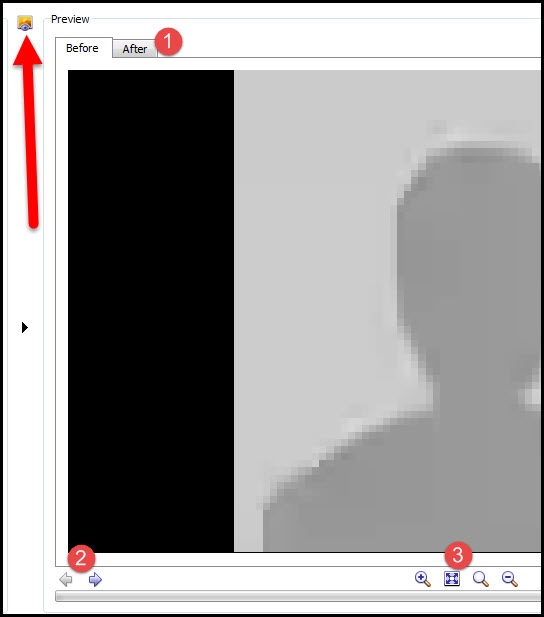
- Click the Actions tab on XnConvert:
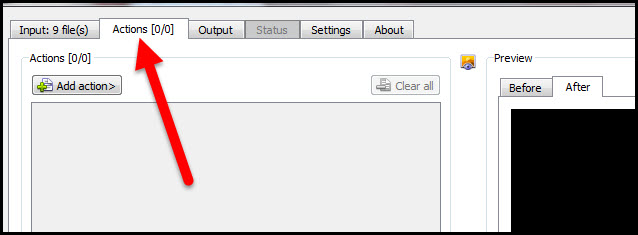
- Here, you can preview your webp images. The sections in the image below marked 1, 2, and 3 can be used to compare the before and after appearance of the images, to move from one image to the next, and to enlarge the image for closer inspection. You want to make sure the image quality hasn’t suffered. If the image is now blurrier than it was before go back to Output/Settings and use a higher Quality setting and then check the previews again. Sometimes the Before or After tabs seem to be stuck on a different image. If that happens click the Update button where the arrow is pointing to show the proper image:
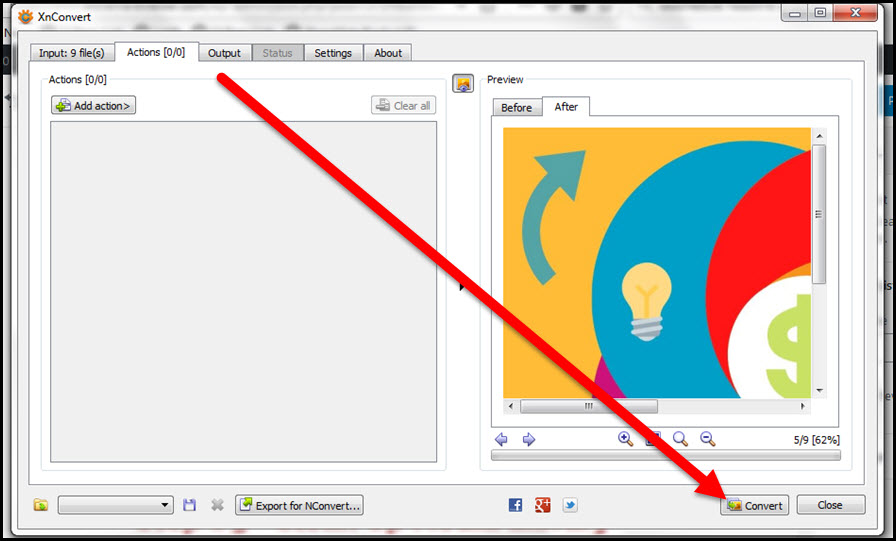
- When you’re comfortable with the webp images click the Convert button:
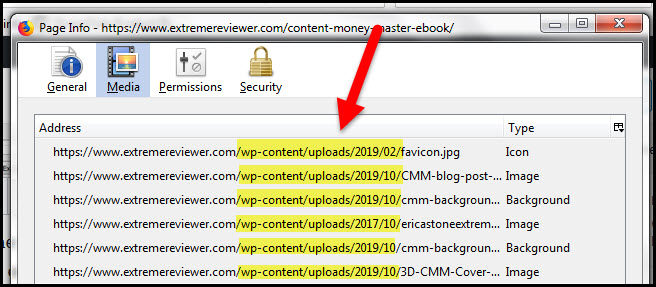
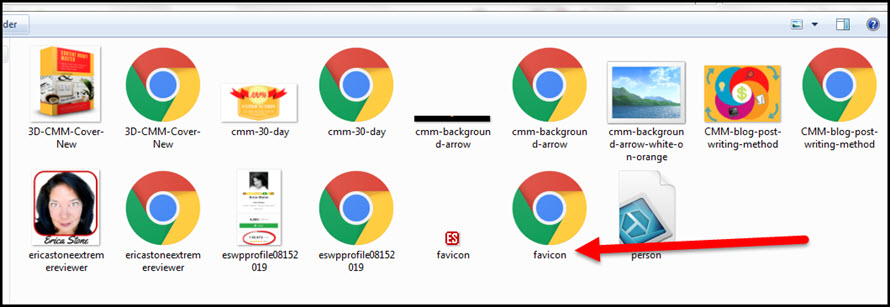
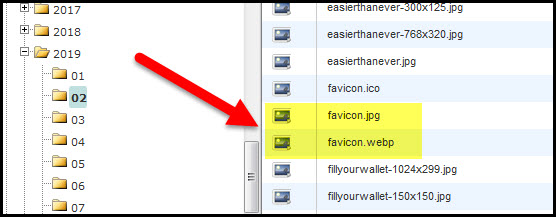
- You now have the webp images on your computer but you have to get each image onto your website in the same exact file where the original is stored. Fortunately, the pop up box on Firefox gave us that information. If you closed the pop up box just repeat the steps outlined earlier to open it up again. Look at the URL for each image. The portion after your domain and before the image name gives you the location of where the image is stored on your site. For example, the first image in the example below is favicon.jpg. The original of that image is stored in wp-content/uploads/2019/02:
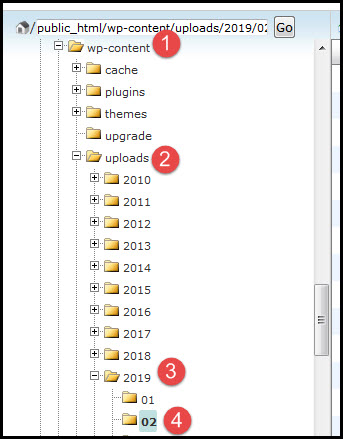
- Log into your hosting account and bring up File Manager just as you did earlier when you changed your htaccess file
- Drill down to the file location of the first image in the pop up list on Firefox. For example, I need to go to wp-content/uploads/2019/02:
- Click the Upload button in the toolbar at the top:
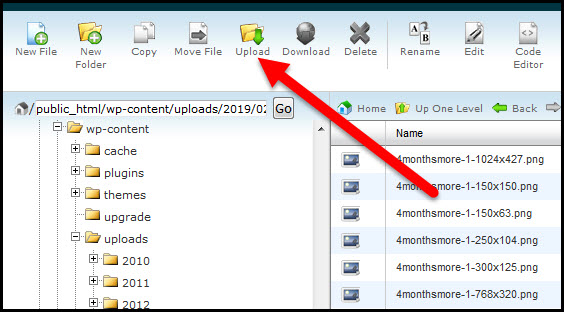
- Click the Browse button and find the file on your computer where you saved your converted images:
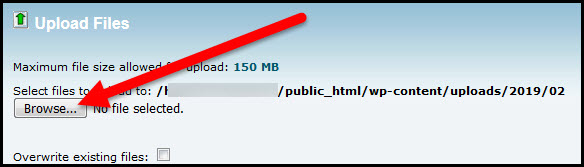
- Choose the webp image that matches the name of the one you’re working with (I was working with the favicon.jpg image so I need to choose the favicon.webp image – and they may look funny – see how mine is just a Chrome symbol?):
- Complete the upload (you may see an OK button you have to push to finish the upload)
- Back in File Manager you should now see both versions of your image in the same folder and with the same name just different extensions (.jpg vs .webp):
- Repeat the steps to upload all of your webp images to their proper folder in File Manager
- Delete all of the images in the folder ON YOUR COMPUTER where you stored both the original and webp images so you can use that same folder for the next post’s images without mixing them all up. Since XnConvert has saved your settings it will automatically output all new webp images to that same folder.
- Repeat all of the above steps for every other page and post of your website (but you can skip images that have already been converted when you did another post – like your site’s header image)
You’re done! All of your site’s images will be displayed as webp when a visitor’s browser can use them.
NOTE: If you ever change your theme you will want to use this set of steps to find any new theme-related images that can be converted. If you are not using a child theme then you may also lose converted theme-related images if you update the theme.
Step #4 – Test Your Site
View Image Info and Google PageSpeed Insights
You’ll want to make sure everything is working as it should.
If you are using a CDN or caching plugin make sure to purge all caches before you test.
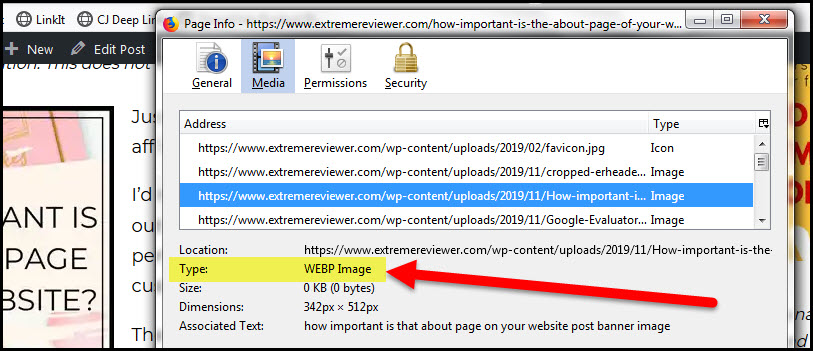
If you’re using a current version of Firefox then you should see “Type: WEBP Image” when you right-click on an image in a live post and choose the View Image Info option. This means the browser is displaying a webp image.
You should also run Google PageSpeed Insights on a page or post of your site for which you uploaded webp images and check to see if the “Serve images in next-gen formats” message is now gone.
You can check your site using the browser on your cell phone or tablet and any other browsers you use on your compuer to see if images are displaying.
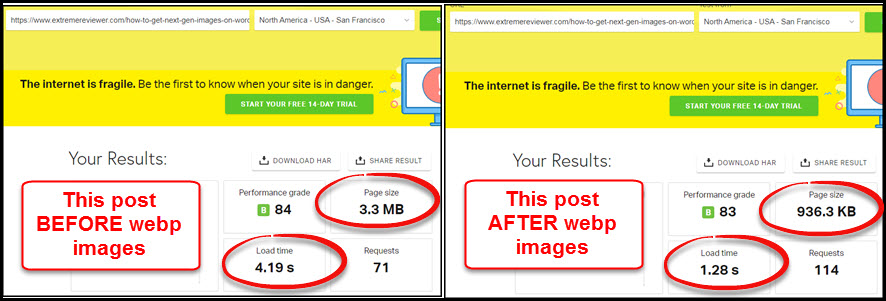
Run various URLs of your site through the Pingdom Site Speed Tool or through WebPageTest to check load times.
This post is absolutely stuffed with images. Before webp it clocked in at a load time of 4.19 seconds and had a page size of 3.3 MB. After webp the load time was 1.28 seconds with a page size of 936.3 KB. Sweet! (Of course, those who view it using a browser that doesn’t accept webp images are going to think it’s horrible…but most visitors – and Google – will love it!)
Finally, if you want to make sure images are being displayed for browsers that don’t accept webp images you can try a cross browser testing tool like BrowserStack.
Step #5 – Clean Up Media Library (Optional)
Delete unused images
I realized there was a side benefit to this method that would help me clean up my Media Library.
It’s littered with images that:
- I uploaded, didn’t like, replaced with another one but had never deleted
- Uploaded in the wrong size, replaced with a resized version and didn’t delete
- Were other sizes of my images created by WordPress or my theme when I uploaded the image but aren’t needed in my site anywhere
If you’ve gone through the steps to upload webp images for all images used by your site then any image in your wp-content/uploads folders that doesn’t have a corresponding webp image isn’t needed and could be deleted.
This only works if you’ve gone through every page and post on your site – every post (even draft posts that you plan on publishing one day); every page including your About page, legal pages, sales page, pages created by a page builder plugin, etc.; and your sidebar, footer and header images.
Back up your site to be safe and then go through all of your wp-content/uploads folders in File Manager in your hosting account.
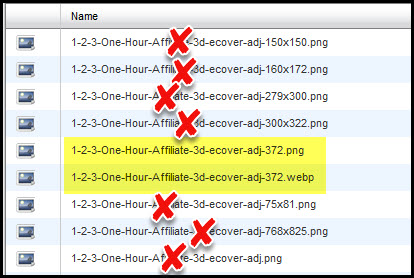
When you see an image that has multiple copies you only need to keep the webp version AND the traditional version that has the same exact file name.
In the photo below I have several versions of the same image. Some have size information at the end of the image file name. These are the ones created by WordPress or my theme.
However, I only ended up creating a webp image for one. The others never came up in my lists of images to convert. Those can all be deleted from within File Manager. Doing so will reduce the total amount of space my site is taking up on my server.
Be careful when deleting images! You don’t want to accidentally delete one you really need.
Going Forward
New process every time you publish
Because this method is manual you need to complete Step #3 for every new post you publish.
Publish the post, use View Image Info to get the list of images, use XnConvert to create webp versions and upload them to the proper folder in File Manager.
You’ll also need to create webp images for the Featured Image that shows on the home page of your site and whatever image is used on the category pages of your site.
Now, if anyone wants to tell us how to easily add a script to our sites that will automatically create webp versions of images as they’re uploaded to our Media Library so we don’t have to do this for every new post I’m all ears!
Thanks Erica My Toysite is getting a lot of hits. But it very slow, I will work on this and see if I can increase it speed.
David, I’m sure this will help! Thanks!
Oh wow…Lots of steps to take! And this new format does better than the Smush plugin you always recommend, yes?
Jennifer, absolutely! This site has Smush, too, and next-gen images still made a major difference. Smush cannot compress images to the smaller file sizes of webp.
Hi Erica,
Excellent info, very generous and very clever, thank you heaps.
One detail – in your load time comparisons, just before step #5, you mention a speed of 1.28s as 1.28 seconds, but then refer to the slower speed (that is shown as 4.19s) as 4 minutes and 19 seconds, which I am guessing is 4.19 seconds.
Best Wishes,
Mike FD
Mike, you’re right! That should be 4.19 seconds. Apparently I have issues with minutes, seconds, and milliseconds because even in my email it was pointed out that I explained I have other posts using this method running at 50 seconds and that should have been 500 milliseconds. (By the way, I have a problem with left and right, too…yikes!). I’ve made the correction. 😉
Hi Erica
I was wondering about the minutes and seconds thing! Was sure you had them mixed up 😉
Thanks for this great info. This explains probably the main reason why the more content I put on my sites the slower they get.
Dave, I just like to see if people are paying attention. LOL! 😉
Thanks for this article Erica! I noticed that the increase in the use of webp images and it was on my to-do list to learn more about this.
I use the Shortpixel plugin on some of my sites, which has the option to automatically create a webp version, so this not an issue.
However I’m wondering how these images work when someone saves a Pin from your site and if Pinterest supports the new format.
Do you have any insights on this?
Daisy – darn good question! I hadn’t even thought to check but I’ve tested a few things now. Pinterest does accept webp images for STORY pins per this help document on their site: https://help.pinterest.com/en/business/article/story-pins. That’s not the same as a regular pin but it does show Pinterest is at least working towards handling webp images.
However, I tested a few pinning methods and that’s where the trouble begins. For example, using the Pinterest browser button did not recognize any of the webp images in a post (at least in Firefox). Anyone who pins using the browser button would not be shown any webp images from the post in the pop up box showing available images to pin.
If you pin manually (copy the URL and manually add a pin to a board) all webp images DO show up as available to be pinned but in their original file extension (.jpg, .png) probably because Pinterest’s screen showing available images picks up the .jpg or .png version.
The Tailwind button for pinning DOES show on webp images, though. That’s good news!
Historically I’ve used the JQuery Pin It Button for Images plugin for WordPress to show a pin it button on images but had removed it awhile ago while I redid the site. I wanted to find something that didn’t hamper site speed at all. However, I put the plugin back on this site as a test and it does not recognize the webp format so no pin it button shows for those images.
THE SOLUTION that worked for me was to go to the Pinterest Widget Builder and create a Save button widget. I used the Image Hover, Round, Large option. This generates a small bit of script that needs to go into your theme files somewhere between
and . I pasted it into th bottom of my header.php file. Then, when visitors hover over an image on your site they will see the pin it button and it does work on webp images.Some social share plugins may be up to date enough to identify webp images but I haven’t tested any – just went with the Pinterest widget.
Hope that helps! Thanks!
A lot of work but I do need to clean up my media library as I tend to use a lot of photo’s in my posts. Thank you for this method, I really appreciate it.
Any time, Tom!
Great post Erica. I normally compress images externally before uploading to Media Library. I have seen few videos on WebP image format but they weren’t clear to me plus the Browser issues. Therefore, did not pay much attention. I also tried the WebP Express Plugin to one of my sites. I did not go well and had to remove it. Your post is very helpful but seems a bit time consuming for a Site with large number of images. I have one of those Sites and planned to use your steps soon. Thanks.
Shahin, it is a bit time consuming but I’m working on some more shortcuts. For example, I just found I can resize images inside of my hosting account (Bluehost). If that works, then the resizing step could go much more quickly. I’m also researching how to run line commands from within the server to automatically convert all existing and new images to webp. I know it has something to do with shell access (which I’ve dabbled in a tiny bit) and/or adding scripts to theme files.
I’ll update this post when I figure it out (or when someone tells me how to do it). 😉
Thanks!
Thanks Erica for these great tips! This would be great if it converts new images automatically so I don’t have to go through these steps each time I uploaded a new image to my media gallery. It seems there are already plugins that can do the job like Imagify.
Marian, yes, there are plugins that will do this. The issue with plugins is two-fold, though. Most only allow some limited volume of changes before they charge a fee of some sort. The other issue is that these plugins can slow down a site (depends on the plugin and the site). This was my way of getting around both issues. The trade, of course, is time. 😉
Thanks!
In using xnconvert I find that some of the images were not properly converted when I checked them with Corel Paintshop Pro.
Rusty, that’s interesting. I have not run into that but the only test I’m using is to make sure that Google picks them up as webp in Chrome Dev Tools. When you check them with your browser (ie, View Image Info in FireFox or Inspect Element) are you still seeing that they’re not showing as webp?
Thanks!