
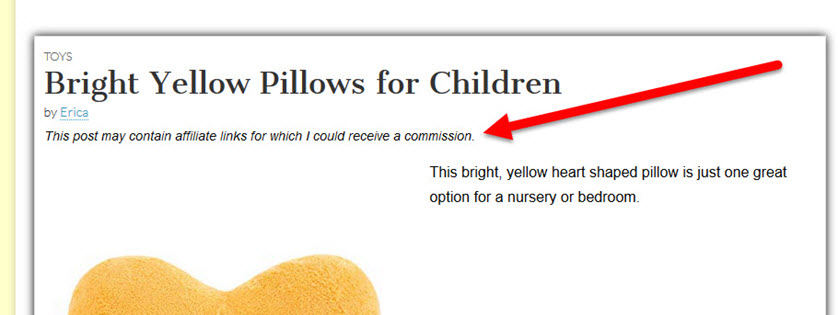
This is the method I used to easily add custom FTC disclosures to the top of every post on my affiliate marketing sites.
After receiving a reminder from the Amazon Associates program on October 18th regarding link disclosures, I decided to bite the bullet and finally put this in place.
The only reason I’d put this off as long as I have was time.
With 9 years experience as an affiliate marketer, I have a good feeling about the things that will positively or negatively impact the results of my sites and I do not believe this change will reduce the number of people who click on the affiliate links in my posts.
I’d also felt comfortable leaving this on the bottom of my to-do list because the FTC website about disclosures implied, for awhile, that the FTC was not actively monitoring blogs and since I put the Amazon disclosure in the sidebar of my sites there was at least some disclosure visible on every page where there were links.
But that Amazon Associates reminder moved this up on my list. I don’t think Amazon will be checking sites for this type of disclosure – they truly only care that we are properly using the one required by the Operating Agreement but before we find ourselves on the wrong side of the FTC we might as well make this change.
I prefer to keep my use of plugins to a minimum and only use a plugin when accomplishing the same thing with my own coding would be overly time-consuming. In this case, an available plugin was the ideal solution because it allowed for more customization of the wording and appearance of the disclosure. I could also choose to exclude the disclosure from showing up on posts where it was not needed.
Create Your Custom Disclosure
Follow the steps below to use the same method I did to add an FTC disclosure to the top of your WordPress posts.
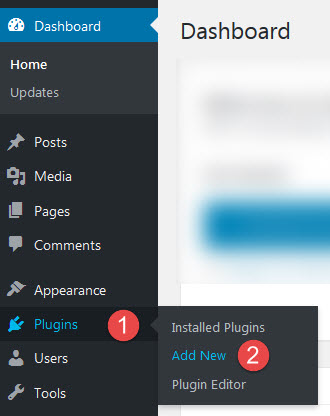
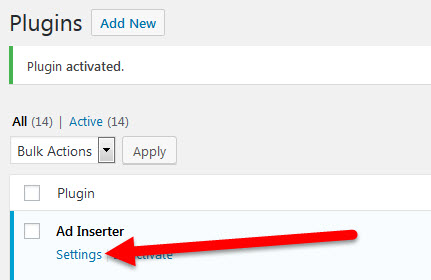
STEP 1 – Go to Plugins/Add New in WordPress:
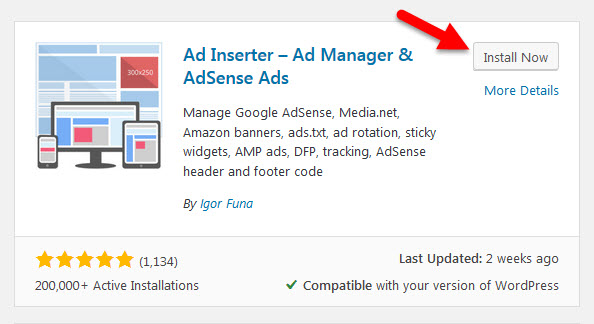
STEP 2 – Do a search for “ad inserter” on the Add Plugins screen:

STEP 3 – Click the Install Now button for the Ad Inserter plugin:
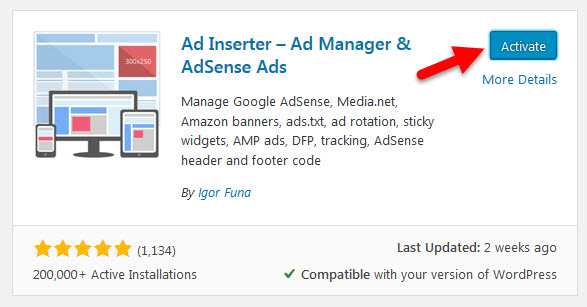
STEP 4 – Click the Activate Now button for the Ad Inserter plugin:
STEP 5 – Click the Settings link under the Ad Inserter plugin:
STEP 6 – Type your desired custom disclosure in the black text box:
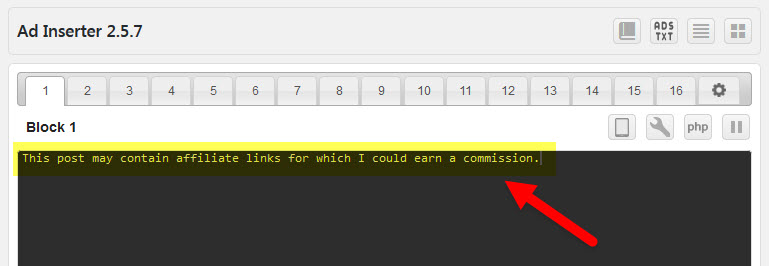
Feel free to use the text above. The FTC doesn’t have specific text that it requires you to use. They are only concerned that your site visitors understand that if they click on an affiliate link in your post that you may earn a commission.
You, personally, may be concerned that your readers understand that this does not negatively impact what they will pay for any item purchased after they click a link on your site.
You don’t want your readers to be afraid to click on links so you may want to add a tiny bit of additional text that would reassure your readers that clicking on your links is safe or that they will not pay a higher price just because they clicked a link on your site. Just keep your disclosure as informative and yet as brief as possible.
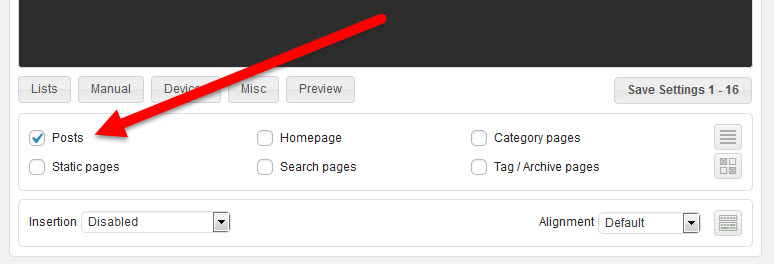
STEP 7 – Make sure the Posts box under the text box is checked:
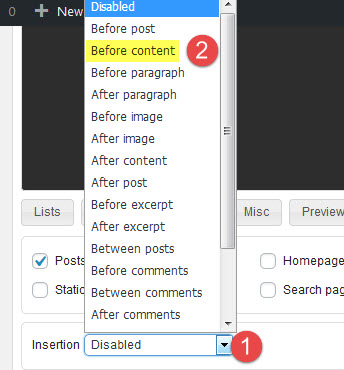
STEP 8 – Click the drop down arrow for the Insertion setting and choose the Before Content option:
STEP 9 – Click the Save Settings button for the Ad Inserter settings:

STEP 10 – Check a live view on your site to view the new FTC disclosure at the top of your post
You’re done! You have now created a custom FTC disclosure to show in every post using Block 1 of the Ad Inserter plugin options.

Each insertion has its own Block number and you can create additional ads or insertions as needed by clicking on unused block numbers.
Any time you want to change your custom FTC disclosure remember to go to the Ad Inserter settings for whichever block number you used when following these steps.
NOTE: I’m not an FTC expert nor a lawyer so everyone should do their own research to make sure they understand the issue and are comfortable they have fulfilled any legal requirements.
Custom CSS for Your Disclosure
Besides using your own disclosure statement you can also customize the look of the disclosure with custom CSS.
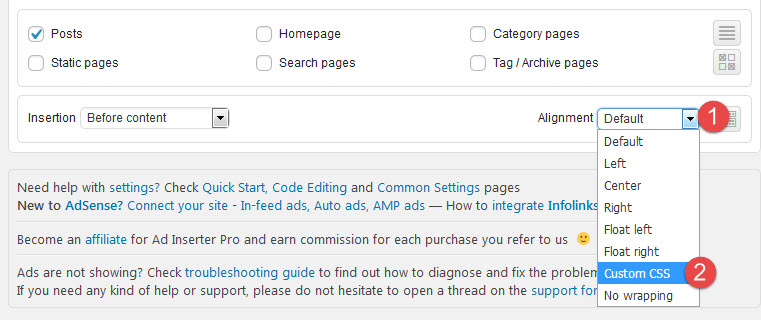
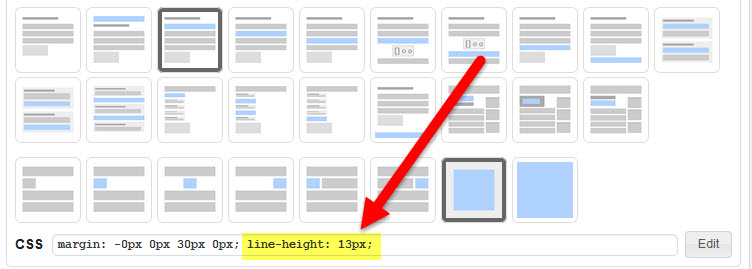
STEP 1 – Click the drop down arrow for the Alignment box and choose the Custom CSS option:
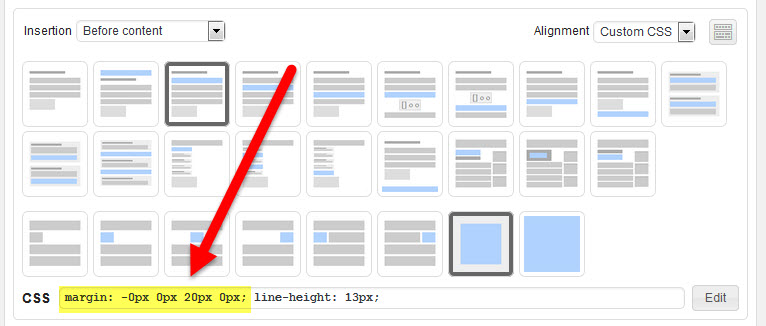
STEP 2 – Enter your desired custom CSS code in the Custom CSS box:
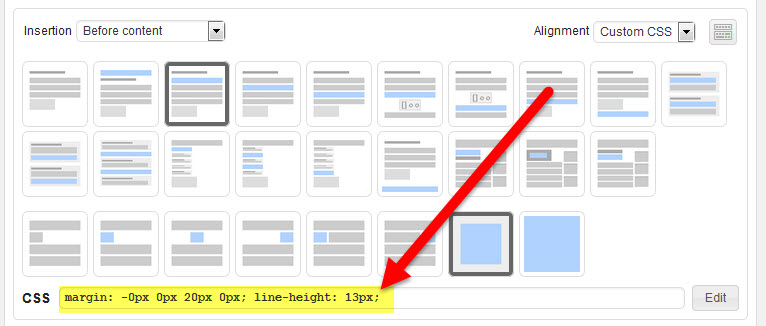
The code in the example above does two things. First, it changes the bottom margin of the text disclosure so there is more space between the disclosure and the actual written content of the post.
Each custom code change needs to have the “;” (semi-colon) symbol at the end of that particular piece of code.
If you only wanted to change the margin then you would use only this piece of the above code:
Whether or not you need to change the margin will depend on the theme you are using for your WordPress site. If you view a live post and find that you want the disclosure text to move up or down then add the margin code to your Custom CSS box.
The first number in the margin code adds space between the element above (usually the post title or the post author/date). You can use a negative number in that field to remove white space between the post title or author/date field if you want to move the disclosure up closer to those elements.
The second number in the margin code adds white space to the right of your disclosure.
The third number in the margin code would add blank space below the disclosure. This can be useful in adding separation between your disclosure and the actual content of your post.
The fourth number would add blank space to the left of your disclosure. This is useful for making the disclosure appear indented.
Test using small changes and saving those changes (5-30px) for the various margins to see how this changes the look of the disclosure text on a live post.
The second part of my example code changes the line-height of the disclosure text. This controls the amount of space between each line of text.
For my theme, I found that the line-height used for my posts left too much white space between lines of my disclosure and it looked funny:

Adding some custom CSS to change the line-height to 13px brought my lines closer together and removed excess white space.
You can also enter some HTML around the text in your text box. I decided to change the font size of my text by using the following code in the text box:
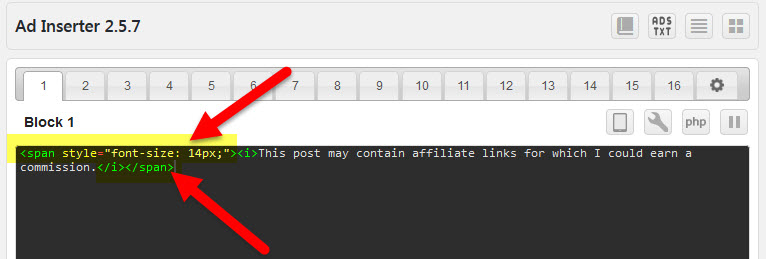
That code changed the font size of my disclosure text so that it wasn’t the same as the size of the font in my post content and also italicized the text.
Not all HTML works in the text box so you might have to play around with adding changes to the Custom CSS box instead of as HTML around your text to get your desired appearance changes.
Removing the Disclosure from Select Posts
If you have posts on your site that don’t have affiliate links, won’t have them in the future and where you do not want such a disclosure to show you can remove the plugin’s insertion of your FTC disclosure.
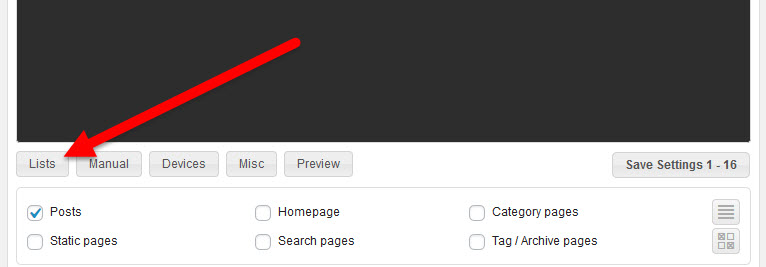
STEP 1 – Go to the Ad Inserter settings screen and click the Block number of the block you used for your FTC disclosure.
STEP 2 – Click the Lists option for your Block (under the black text box):
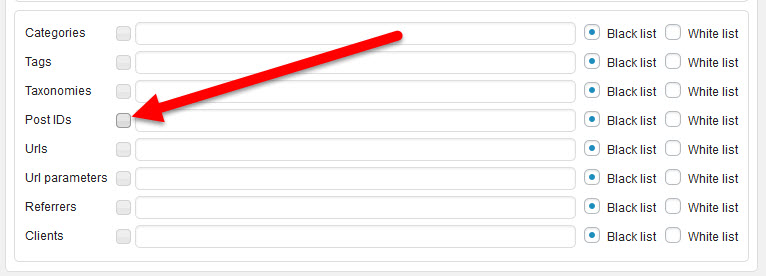
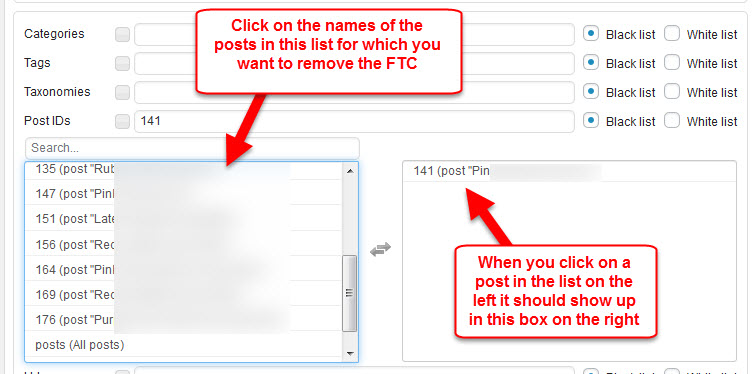
STEP 3 – This new box will show up at the bottom of your Block settings. Click the Post IDs option:
STEP 4 – You should now see a list of all of your posts in a box on the left. Scroll through the list and click on the posts where you want to remove your FTC disclosure. The posts you select will be shown in the box on the right:
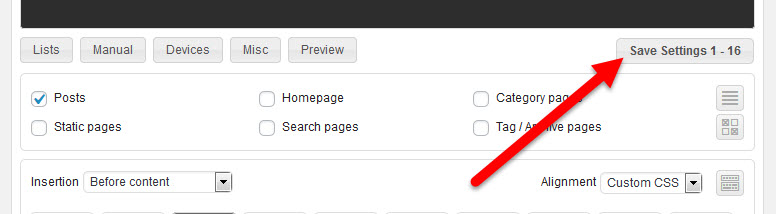
STEP 5 – Scroll back up and click the Save Settings button for your Lists changes:
You’ve now saved your changes and your disclosure won’t show on the posts you selected.
Of course, you can use this same plugin to insert actual ads or other kinds of material into your posts but using it for custom FTC disclosures that include the text you want and appear the way you want makes certainly keeps things nice and simple!
Thank you so much for this. I saw that email from Amazon, but have been putting off dealing with it. LOL
(Thanks for helping me finally deal with it.)
It looks good and not intrusive.
Take care,
Donna 🙂
Yes, it’s not intrusive at all and since you can control the appearance you can make it look nice with any theme. Thanks!
Great information and precise, easy to follow instructions as always. You rock!
Aw, thanks!
Do you think this will reduce the number of clicks and sales I get? Can you tell me if you have seen any changes with your stats after you included the disclosures?
Steve, I’ll try to remember to post an update on any changes I see in my click-through rates when they’ve been up long enough to assess but I really don’t think you’ll see any change. Consumers are becoming familiar with these disclosures, site visitors usually respect honesty and shouldn’t be turned off by this type of disclosure, and if you’re sharing information that the reader finds useful they aren’t likely to hold it against you for making a bit of change in the process. 😉
My first thought when I received the Amazon Associates email was, “I bet Erica will send out her own reminder.” I did not expect a detailed tutorial, with every step mapped out. I’ve already added the FTC disclosure to my sites, but was dreading the task of including it on hundreds of posts. Thanks to you, this problem will be handled with ease.
Kim, glad to hear it! I, too, was concerned about the time involved if I were to do this manually but I was able to install this on nearly 20 sites in an hour or two (and that included taking time to update WordPress and plugins on all the sites).
I’m using a Reusable Block for my additional disclosures, I’m not sure if that’s a regular Gutenberg thing or if that was part of the Ultimate Add-On set of extra blocks. Same idea as what you’ve done here. I have a few more sites to update with new disclosures this weekend.
That reminder from Amazon sent everyone into a panic. I think most people had good disclosure already, now everyone is second guessing themselves and worrying 🙁 I’ve even seen a few people putting disclosure at both the top and the bottom of their posts.
Loretta, yes, a Reusable Gutenberg block is also an option. I did come across that in my research.
In case other readers don’t know – a reusable block is a standard Gutenberg block where the user can input something (text, an image, etc) and then save the block with a unique name. The new block then becomes one that the site owner will see as a block option when editing any other posts on the site. So, one could put their disclosure text in a reusable block in Gutenberg and then add that block to all the other posts on that same site. I think, though, that you then have to remember to add that block to each post on the site manually?
But, oh my, two disclosures in a post is probably getting a bit paranoid. Those poor folks! Of course, none of us wants to risk our income so I can understand overthinking the issue.
Thanks!
Thanks Erica,
I too received the same disclosure email from Amazon and was wondering what to do about it.
In the end i put the disclosure in the footer of every post with a text widget. Your solution though, seems much better than mine in terms of visibility, especially as the disclosure should really be above the fold.
Mark, I do like this option for the very reason you state – getting that disclosure above the fold. But at least having it on every page of your site was likely a step up from most so congrats on at least facing the issue head-on. 😉
Thanks for this option! I have been using the Genesis Simple Edits plugin for my disclosure statements, but it applies the statement globally. Like you, I do have a few posts that don’t have affiliate links and since I am already using this particular plugin for displaying ads I may as well make the changes. Thanks a bunch!
Jennifer, glad it will help! Thanks!
Thank you for sharing this! I also received the email from Amazon. I thought I was okay since I have the Amazon and FTC disclosures in the sidebar or footer on my sites. I will be fixing them with the plugin now.
Valisa, you probably were okay but it’s just so hard to tell that this kind of move will probably make you that much more secure. Thanks!
Hi Erica,
First, thank you for the super-helpful info on adding that FTC disclosure. Nifty!
Question: Do we also need to add something like ‘paid link’ or “#ad” after Amazon links? They were mentioned in that email.
Ken, the reference to those terms applied to affiliate links placed on social media sites like Facebook pages and YouTube and not to one’s website. Thanks!
Interesting, I followed your instructions but then stumbled on to a popular blogger website where they have every affiliate link indicated… I can’t help but wonder if that is the better approach?
Craig, I reviewed that site’s post and, interestingly, they are using two disclosure methods in that post.
They have a disclosure statement at the beginning of one of the subsections right before they start including affiliate links (similar to the type of disclosure mentioned in this post) and they also have “(affiliate link)” showing after each affiliate link.
Ideally, that is what the FTC would like to see but I think that is not always necessary. Each webmaster has to decide for themselves how far they need to go in order to effectively and clearly identify the existence of affiliate links in their content.
There may be several reason that blogger has gone to that extent (especially for that specific post):
That method could be best for the type of blog they have and their target audience and/or for that kind of post.
Your goal should be to use the best approach for YOUR site and YOUR audience that will keep you inline with the FTC requirements and that might mean using different methods for some or all of your posts.
One of the methods I’ve taught for building an Amazon affiliate marketing site relies on lots of short posts. The post features a product image from Amazon with an Amazon buy button underneath and a few sentences of text. A disclosure statement at the top of the post would then lie right above the product image – whether one viewed the post on a desktop, laptop, or cell phone – which puts it right by the link itself. That should suffice for that scenario.
Each webmaster needs to make the decision for themselves as to how they want to deal with these disclosures because not all sites are the same. Look at your site on various devices and consider the positioning of your affiliate links and disclosures. If you were a site visitor and were about to click on an affiliate link would you clearly understand that the link was an affiliate link? Would you absolutely have seen a disclosure shortly before doing so?
Remember, too, that if you have jump links (like a Table of Contents) in a post then a visitor could be sent to a section of your post and completely miss the top of the post and, in those cases, a disclosure statement at the top of each post might not be your best option.
For those who decide to use the approach of putting a generic disclosure at the top of each post changing the appearance of the disclosure might be the best option. For example, if the disclosure were in bold, red font or was wrapped in a thick, red border or had a yellow background so it was more obvious then that alone might meet the definition of identifying the existence of affiliate links.
The words chosen for the disclosure could make a difference, too. For example, what if your disclosure statement had formatting as I’ve just described above AND said something like this:
PLEASE NOTE: EVERY link in this post is an affiliate link. When you click on such a link and buy something from the retailer at the end of the link I may receive a commission. This does not change your price and I do not accept offers of free goods or money in order to choose the products I recommend. All the recommendations are based on my own opinions. I just want to be clear that this is how my site earns money.
It would be hard for a reader to say they’d missed that disclosure.
Of course, I’m not a lawyer so each person should do their own research and make the choice that is best for them based on the kind of site they have, the kinds of posts they have, and the kind of affiliate links they’re promoting.
Thanks!
Thank you so much for this and all of your tutorials! They are all very detailed and easy to follow. You are a great teacher!
Kathy
Thanks, Kathy!
Hi Erica.
Thanks for your always great help, I had left it out until now, and as always easy to follow how to do it, great for me as I always need your help😉 as you know😊
Thanks for keeping us updated when new rules come and how to implement them.
Kind Regards
Ingelise
Any time, Ingelise!
Have you nothing that using as inserter causes the disclosure to appear in your meta in search results? I had this happen with a disclosure plugin so I started adding it manually after the intro paragraph.