

I’ve used Pinterest for years to help draw traffic to my various websites but I’ve been hyper-focused on it the past several months.
Every time I think I have the site figured out – they change it. Features are there one minute and gone the next. One day screens look the same regardless of browser and another day they’re different. They do like to mix things up, don’t they?
One thing that has stayed the same for awhile now is the ability to choose an image to act as the cover of a board on your Pinterest profile. I think choosing covers for your boards is an important step in setting the “look” of your profile. If people visit your profile, your board covers can help them get a feel for your overall focus. You can choose the prettiest images, or choose board covers that all have the same color scheme, or choose images that have text on them that help the viewer understand the content without them having to search for the board’s text title.
Unfortunately, the selection of the image you choose doesn’t always stick AND – at least for now – the portion of the cover image that is displayed can vary by browser or mobile app.
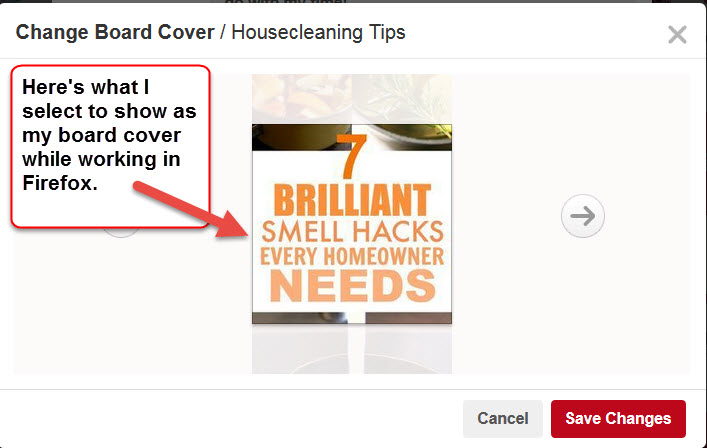
For example, here’s what I set as a board cover while working in Firefox:
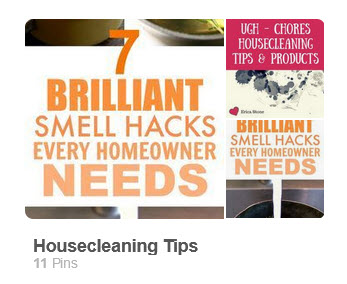
The board cover comes out looking as I’d like and the text that I wanted to show is fully visible. The first few pins for the board show to the right of the cover image:
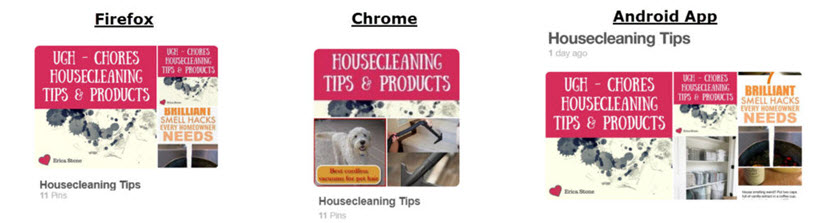
But here’s what that cover looks like in Firefox, Chrome, and Android side by side so you can see the differences:
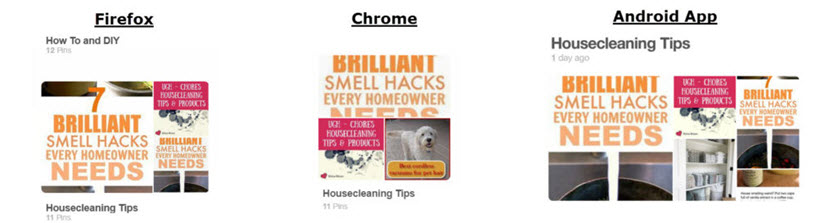
Notice that the top and bottom of the image portion I see in Firefox have been cut off in Chrome and now the first few pins for the board show underneath my cover image. In Android, the top portion is cut off, more of the bottom portion of the image shows, and the first few pins show to the right again.
And I haven’t even checked other browsers or apps….all I know is that choosing a board cover, while seemingly a nice way to customize one’s profile, can be a nightmare in and of itself because you might not get the look you’re after at all and it certainly won’t be consistent browser to browser. If you’re not careful, you might get a board cover that shows a very odd selection of text or a body part you don’t want to focus on as a board cover!
One solution is to create your own custom board covers.
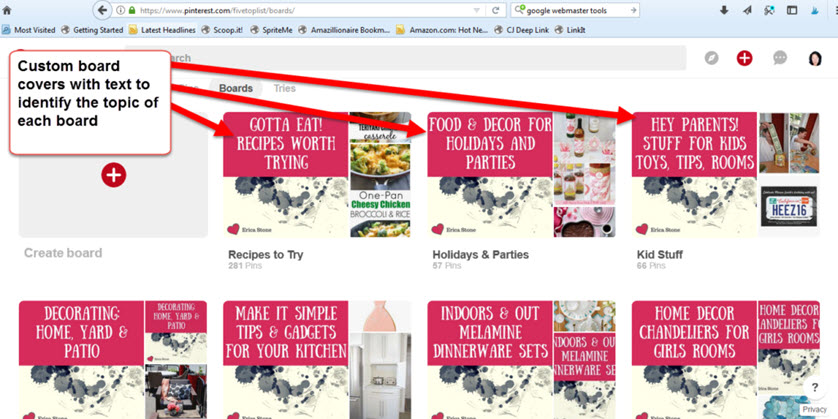
I have no idea if custom board covers will help your profile attract more followers or get more repins but I do know it makes for a nice, potentially fun, controlled presentation of your board list. Here’s one of my Pinterest profiles with all custom board covers (you can visit the profile at https://www.pinterest.com/fivetoplist/boards/ for a live view):
The challenge: If each browser shows a different cut of the board cover, how do you create a custom cover that will show nicely on each browser?
By playing around with the different views, I was able to create a template that told me where to put my text for any board cover such that the text would show the way I wanted.
The template is an 800 x 800 pixel square with a transparent background and two black, dotted lines. If you lay this over any board cover image you are creating you’ll be able to tell whether your text or background image will show properly. Any text in between the two dotted lines will show on Firefox, Chrome, AND the Android app. The template looks rather bland (as it should) and here it is (keep scrolling – there are instructions below the template!):

Create the Custom Covers
Even if you don’t have the least bit of artistic creativity, you can follow these steps to create custom board covers. I use a free online tool called Canva. Just follow these steps:
- Right click on the template image above and save it to your computer
- Log into Canva
- Choose the option to Use Custom Dimensions

- Set the image width and height to 800 x 800 px and click the Design button
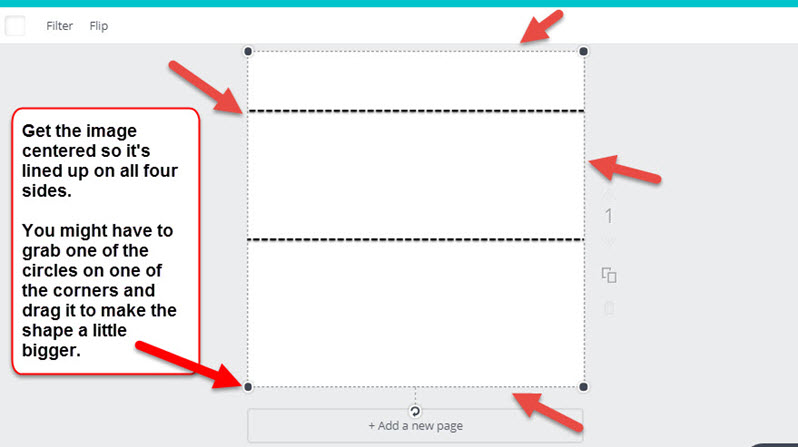
- Click on the Uploads tab in Canva, click the Upload Your Own Image button, and upload the template image you saved to your computer
- When the template is done uploading, click on it and drag it over to your blank canvas. Center it on the canvas so it covers it perfectly.
- Click the Text tab on the left in Canva
- Click on a text size from the top options. This will place a text box on the canvas.
- Put your cursor in the text box and replace the default text with any text you want for your board cover.
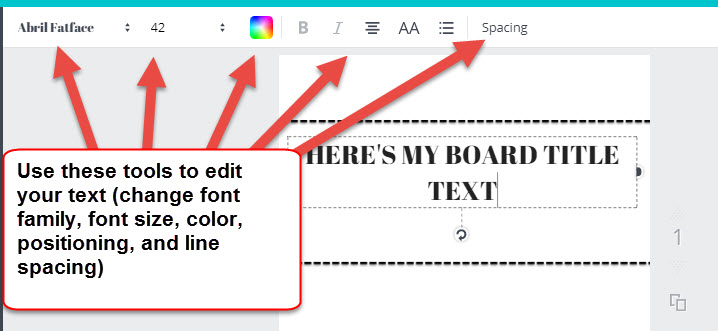
- Use the edit features to change the font size, the size of the text box, the font family, and the font color
- Click and drag the text box into place, if necessary, so that it falls between the two black, dotted lines. You can click and drag one of the side handles on the text box to make it wider (just don’t make it wider than the image itself). You may have to reduce the font size to make the text fit but you can also choose to change the spacing between lines to move the lines closer together (click the Spacing link in the edit toolbar).
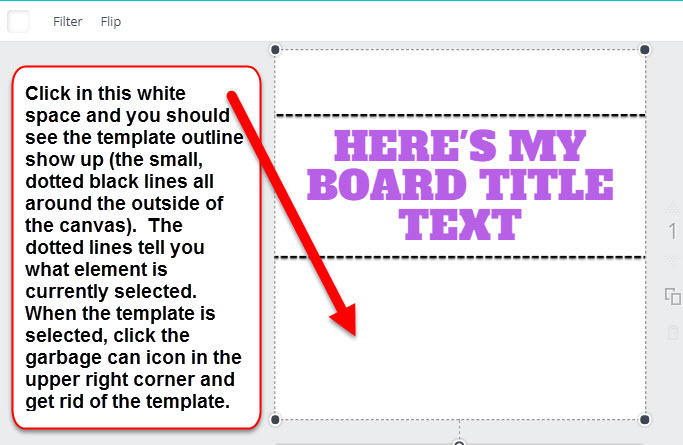
- Once the text is in place, click on the template you have sitting on the canvas and click the garbage can icon in the upper right of the screen to delete it (make sure you’re deleting the template image and NOT the text you just added)
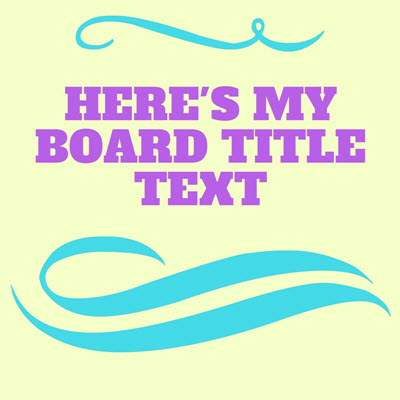
- Now, you can add any other elements you want under or around the text – just don’t move the text! For example, you can click on the Background tab on the left and choose to use a solid or patterned background to show behind your text, or you can click the Elements tab and add various shapes, graphics, arrows, lines, and frames around your text, or you can click the Uploads tab on the left and upload your own image to use behind the text. Here’s a simple board cover with just a solid background color and two line styles from the Elements tab added above and below the text.
- Once the image looks as you’d like, click the Download button in the upper right of your screen in Canva and save the image to your computer
- You can either repeat the above steps to create a brand new look for another board cover OR go back to the main screen of Canva, refresh the screen, click the little arrow over your new board cover image and choose to create a copy. That will create a second copy of your board cover. Click on that second cover and the edit screen will open in a new tab of your browser. Simply change the text to match a different board and download the image. This will allow you to create an identical board cover for each board where only the text changes.

Here’s a comparison of my final board cover design on Firefox, Chrome, and the Android app:
I’m sure at least some of you will ask why I have a line of text at the top of the board cover that doesn’t show on Chrome. I made sure to put the critical part of the board cover name in between the two dotted lines of the template but that doesn’t mean you can’t put text above or below those lines. As long as each browser view makes the title itself clear, you’re good!
Use the space between the template lines for the critical text and then, if you want, you can put text outside of the lines that just sort of makes things fun for at least Firefox and Android app users. In this case, I thought it would be neat to say something like “Ugh – Chores” at the top but the text in the important space makes it clear the board is about Housecleaning Tips and Products.
For MY cover design, I downloaded a simple white, black, and grey background image from MorgueFile that I could use for free. Once my text was in place, I uploaded the image from MorgueFile using the Upload tab in Canva. I then clicked on that image to place it on the canvas. I resized it and moved it into the position I thought worked best. I clicked the Arrange button in the upper right of Canva to move the background behind the text.
I then went to the Elements tab, clicked on Shapes and chose a square to put on the top half of my image. I chose a pinkish background color for the square and clicked the Arrange tab to move the square behind my text but on top of my background image. I added text at the bottom of the image to show my name (although I could have put my Pinterest profile name in that spot or left it blank, of course.)
Play around with the different tabs in Canva and have some fun with your covers!
Upload the Cover Image to Pinterest
The next step is to get the cover images into place on Pinterest. To do this:
- Log into Pinterest
- Click the red cirlce with the + button in the upper right corner of Pinterest and choose to Upload an Image
- Navigate your computer files to select the image you created for a board
- If you have a post on your own website that is closely related to that board, put the URL for that post in the URL field for your image – otherwise, leave the URL field blank
- Click the Continue button
- Write a description for the pin in the field under the image and then click the Save button next to the name of the board to which that image should be pinned
- Click the Close button
- Go to your list of boards in Pinterest, click the Edit button for the board where you added the new image, click the Change button for the Cover Image setting, choose your new image and Save the change (if you don’t see your new pin in the board refresh your browser screen to see the newest pins)
Your new custom cover is in place! Check how it looks on various browsers and you’re done!
Thanks for the tutorial Erica! I love anything that can be created in Canva. It’s so easy to learn and use.
Thanks, Sherrie! Canva is wonderful, isn’t it? You should read the story about the young woman who created it. Quite a business she started! 😉
Erica! This post is an AMAZING way to start posting here! I’ve been waiting – literally – for you to start posting here. I would think, “This is totally meant to be a blog…I wonder when she’ll start sharing content here. Hmm.” 😀 No joke! And to start off with a tutorial like this is just genius.
I recently started sharing my journey about a Pinterest technique over on my blog and I’m going to link to this post. What a cool resource!
If you ever see my Savvy Blogger Pinterest page, you’ll see I did board covers awhile back, but the changes threw them out of whack.
I can’t WAIT to try this out! Board covers look so much nicer when they’re done right. And Pinterest is great for free traffic that actually converts, so I like tweaks like these that can help me get those clicks on my pins!
Looking forward to your next post!
Julie, I hope people follow the link to your post (I’m going to reshare it here so it’s not missed) as you have built quite a resource for affiliate marketers! You know I’ve watched as you’ve worked on it and it’s wonderful. Here’s the link, folks: https://thesavvyblogger.com/how-can-you-make-money-with-pinterest/.
Thanks!
Erica,
What a nice compliment! It means a lot coming from one of my favorite teachers. Thanks for the share!
Congrats Erica on your first post 🙂
Chris
Thanks, Chris!
Very interesting!
Thanks, Laura!
Hey Erica, so good to read this post. It’s been long I heard from you, but believe me two days back only I was thinking about you. That I havent read any of your posts and here comes this informative post. Thanks for sharing, please do share some more pinterest tips too for getting more traffic
Thanks, Shadaan! Will do! I’m testing some interesting strategies at the moment so more to come!
Thanks Erica-generous of you to share! I already made one. Great to know it’s going to work n all these browsers! Really appreciate all the good stuff you give out to subscribers-
Thanks, Kimberly!
Great post Erica, thank you for sharing
Thanks, Wilson!
I’m not sure if you are familiar with Thrive Themes but in their editor, you can actually see as you work on all 3 sizes and you can change each one individually if you choose? You might want to look into it?
Kaye, I have used Thrive in the past but haven’t in quite some time now. Thanks for the tip!
Thank you Erica! – I was about to emulate your covers (nick the formula) and was wondering how to place the text effectively when I found this post through your Pinterest board. Excellent instructions, as ever, that anyone can use whether or not they have an image editing program.
The tips about which bits are seen in different browsers are invaluable!
And this may be your first post here, but is by no means your first ever. Your professionalism and generosity shines.
Thanks, Christina! You’re too sweet! 😉
Finally! I have been wondering for years why you did not have a blog. Thanks so much for sharing this! Now I have no excuse to not create these board covers.
Can’t wait for your next post!
Thanks, Daisy! I’ve put everything off as I’ve worked through my career in internet marketing. I actually was sure that I never wanted an email list so I didn’t start one until I’d sold my 3rd or 4th ebook. Then I put off building sales pages for my products. Then I put off….and on and on….but now it’s time to get “building an IM blog” crossed off my to-do list! 😉
Awesome post with sooo much useful information clearly outlined in a step by step process. Many thanks for sharing
Any time, Ali! Thanks!
I’m so going to use this great tip Erica! I have been looking for a way to create a cohesive uniform look and this will really make my brand shine! I especially like that the cover images will look great no matter which browser is used and that is an extra plus! Thanks and keep up the great job!
Glad this will come in handy, Faith! Thanks!
Dear Erica,
Good day.
I wonder is Pinterest still a good way to drive traffic from Google?
Is it still worth to invest time to develop Pinterest board?
thanks & regards,
Winson
Winson, Pinterest is still a great way to drive traffic to a website although not as easy to rank in Google for individual boards and pins as it used to be due to sheer competition and the ever-growing number of Pinterest’s own search results that are taking some of those rankings. However, showing up in the Pinterest search result URLs that show in Google still drives indirect traffic to one’s site, too.
Thanks!
Thanks Erica. I’ve been wanting to use Pinterest for ages as I see so many beautiful images there and really wanted to use that Medium some how. I appreciate all this advice you’ve given and really must see if i can get myself set up in this way to finally use Pinterest with value. It will inspire me to get the Blog going too!!!!
JohnO’York
Thanks, John! Let me know if you need any help. 😉
Really great tutorial as always and I was able to follow it to a T…My new board covers look great! Very professional now. Just one thing to mention – I saw that the template is in that new webP format you mentioned in a later post, and Canva didn’t recognize it…So I ended up doing a screengrab of it instead saved as a png, which still swirled out good.
Good catch, Jennifer! I’ve removed the webp image so the png version is back to being available. Thank you!
I love the way your Five Top List boards look. So creative. I definitely want to do this for new Pinterest accounts I’ll be creating for new upcoming sites I’m working on. Thanks so much for sharing!
Thanks, KonaGirl!